


Heavy Containment Zone: Difference between revisions
From SCP: Secret Laboratory English Official Wiki
More actions
| (162 intermediate revisions by 12 users not shown) | |||
| Line 1: | Line 1: | ||
'''Subsection-05''' of [[Site-02]], also known as the '''Heavy Containment Subsection''', or '''Heavy Containment Zone''', is one of four zones found in ''SCP: Secret Laboratory''. The zone contains several important features such as the [[Micro H.I.D.]], the [[Alpha_Warhead|Alpha Warhead Silo]], and the [[Emergency Power Stations]]. | |||
__TOC__ | __TOC__ | ||
==Description | =Operational Guide Overview= | ||
Heavy Containment Zone | {{OpGuide2}} | ||
=Description= | |||
The Heavy Containment Zone is an industrial zone with exposed pipes and cargo crates scattered around the zone. These props often serve as a connection between the various hallways found in the zone. All playable [[SCPs]] will spawn in Heavy Containment Zone besides the Remote Admin exclusive [[SCP-3114]]. | |||
Up to 60% of connectors between rooms will have a Standard Door with a minimum of 50%. These include connections that are guaranteed to have Standard Doors. Some room connectors may spawn with a massive Bulkhead instead. These doors will instantly kill any [[Humans]] crushed between them. SCPs will only take 200 damage when crushed. Up to six Bulkheads can spawn in the zone with a minimum of four. | |||
Exclusive to Heavy Containment Zone are the [[Emergency Power Station]]s and [[Experimental Weapon Locker]]s. [[SCP-244|SCP-244-B]] has a 35% to spawn in a random room located within Heavy Containment Zone. Around the zone are alarms in certain rooms that will blare under certain circumstances. The alarms will trigger for 20 seconds when a [[High-Explosive Grenade]] detonates nearby or when a player dies to an SCP, a [[Chaos Insurgent]] or a [[Class-D Personnel]]. The alarm can be heard up to three rooms away. | |||
{{Related|Soundtrack}} | {{Related|Soundtrack}} | ||
| Line 16: | Line 18: | ||
{{multi-listen end}} | {{multi-listen end}} | ||
= | =Rooms of Interest= | ||
Rooms of Interest are special rooms found within a zone. These rooms contain loot, be a spawn point for players or have some environmental interaction. They easily stand out in appearance compared to the standard hallways. These rooms often only spawn once within the map with a few exceptions. | |||
== | ==Alpha Warhead Silo== | ||
{{ZoneImage|ImageName=NukeOut|October=HalloweenNukeTop|FileType=.jpg|description=The upper floor of the room}} | |||
{{ZoneImage|ImageName=NukeMainAreaFront|October=HalloweenNukeEntrancepng|FileType=.jpg|description=The entrance to the main area}} | |||
{{ZoneImage|ImageName=NukeControlFiring|October=HalloweenNukeFiring|FileType=.jpg|description=The firing mechanism and control panel for the warheads}} | |||
The | {{ZoneImage|ImageName=NukeArm|October=HalloweenNukeArmory|FileType=.jpg|description=The armory section of the silo}} | ||
{{ZoneImage|ImageName=NukeVent|October=HalloweenNukeVent|FileType=.jpg|description=The entrance to the vents}} | |||
The '''Alpha Warhead Silo''', also known as '''Subsection-05-1''', is a three way hallway variant found in the zone. It contains two elevators that lead down to a lower section of the room that contains the Alpha Warhead. The elevators will crush and instantly kill any player that is under them. | |||
{{ | |||
{{ | |||
The lower section of the room is broken into multiple sections. Such as a smaller back area that acts as an armory. There are multiple paths that can be taken within the silo, including two ventilation hallways that lead to the main chamber. The entrance of these are located near the left elevator. | |||
The main area of the lower section contains a bottomless pit that instantly kills anything that falls down it. In the ceiling of the room is the Alpha Warhead. In the center of the room is the firing mechanism with a control panel. The lever can be flipped to either ready or disarm the warheads in Site-02. The red cancel button must be pressed if the detonation sequence is commencing to stop it. Next to the control panel is a dead [[Scientist]] with a [[COM-18]] and a [[Keycard#Unique Devices|Surface Access Pass]]. Behind the Scientist is a series of pipes that each connect to the various warheads within Site-02. | |||
[[ | |||
{{multi-listen start}} | |||
{{multi-listen item|filename=Nuke Vent Audio.mp3|title=Audio Log}} | |||
{{multi-listen end}} | |||
'''Guaranteed Spawns:''' | '''Guaranteed Spawns:''' | ||
* [[Keycard| | * [[COM-18]] | ||
* [[Keycard#Unique Devices|Surface Access Pass]] | |||
'''Possible Spawns:''' | '''Possible Spawns:''' | ||
*[[Emergency Power Station]] | |||
*[[MTF-E11-SR Rack]] | |||
*[[Weapon Locker Type 21]] | |||
<br clear=all> | |||
==Acroamatic Abatement - Waterfall== | |||
{{ZoneImage|ImageName=AAGround|October=HalloweenAAEntrance|FileType=.jpg|description=Acroamatic Abatement Room Overview}} | |||
{{ZoneImage|ImageName=AATop2|October=HalloweenAATop|FileType=.jpg|description=Top view}} | |||
{{ZoneImage|ImageName=AABot|October=HalloweenAABottom|FileType=.jpg|description=Lower section}} | |||
The '''Acroamatic Abatement - Waterfall''' is an area of Heavy Containment Zone with the purpose of disposing anomalous waste such as [[SCP-173]]'s fecal matter or [[SCP-939]]'s amnestic vapor. The room acts a four way intersection and will always have standard doors for its connectors. | |||
The ''' | |||
The center of the room is a giant water fall leading down to the pit. Any player who falls down the pit will be instantly killed. | |||
A lower section within the room can be viewed from the above. This place can not be reached during normal gameplay. It is the location of one of many hidden capybaras in the game. | |||
SCP-244-B can not spawn in this room. | |||
'''Possible Spawns:''' | '''Possible Spawns:''' | ||
*[[Emergency Power Station]] | |||
<br clear=all> | |||
==Acroamatic Abatement - Wayside Incinerator== | |||
{{ZoneImage|ImageName=WaysideRoom|description=Overview of the room}} | |||
{{ZoneImage|ImageName=WaysideRoomAlt|description=Alternate view}} | |||
The '''Acroamatic Abatement - Wayside Incinerator''' is a corner piece room with a fiery pit in the center of the room. The room acts as a disposal location within Site-02. Falling into the pit will instantly kill the player. | |||
SCP-244-B can not spawn in this room. | |||
<!---THOSE WHO INHALE THE DUST WILL BE DISPOSED OF IN THE INCINERATOR---> | |||
<br clear=all> | <br clear=all> | ||
== | ==Armory== | ||
{{ZoneImage|ImageName=ArmoryOuter|October=HalloweenHCZArmory|description=The outside of the armory}} | |||
{{ZoneImage|ImageName=ArmoryInner|October=HalloweenHCZArmoryInside|description=The inside of the armory}} | |||
{{ | The '''Armory''' is a three way intersection that contains a low tier armory in the center of the room. The three entrances to this room will always be the standard small door. The bottom of the room is a bottomless pit that will instantly kill anything that falls in. | ||
| | |||
| | |||
}} | |||
The ''' | |||
The armory | The armory requires a Keycard with Security Access Tier 1 to open. Inside is a COM-18, a stockpile of ammo and a [[Workstation]]. A Bulletproof Locker №7 or First Aid Cabinet may spawn inside the armory. | ||
'''Guaranteed Spawns:''' | '''Guaranteed Spawns:''' | ||
| Line 128: | Line 98: | ||
** [[First Aid Cabinet]] | ** [[First Aid Cabinet]] | ||
*On the outside walls: | *On the outside walls: | ||
* [[First Aid Cabinet]] (up to two) | ** [[First Aid Cabinet]] (up to two) | ||
* [[ | ** [[Emergency Power Station]] | ||
<br clear=all> | |||
==Deep Corner== | |||
{{ZoneImage|ImageName=DeepCornerOverview|October=HalloweenHCZDeep|description=Corner Deep Overview}} | |||
'''Deep Corner''' is a corner type hallway found throughout most of the zone. Around 90% of corners in the zone are this variant. The room contains a small group of boxes along a wall. This can serve as a hiding place from threats or to take cover during gun fire. Randomized loot will spawn on one of the boxes in the room. | |||
<br clear=all> | |||
'''Possible Spawns:''' | |||
On top of the box: | |||
{| class="wikitable wikitable--stripe" | |||
|- | |||
!colspan="2"|Loot | |||
!Chance | |||
|- | |||
|{{ItemTable2|Flashlight}}<br><p>{{ItemTable2|Painkillers}} | |||
(x2)</p> | |||
|{{ItemTable2|Radio}}<br>{{ItemTable2|Zone Manager Keycard}} | |||
||30% | |||
|- | |||
|{{ItemTable2|9x19mm}}(30 Rounds) | |||
| | |||
||20% | |||
|- | |||
|{{ItemTable2|9x19mm}}(30 Rounds) | |||
{{ItemTable2|COM-18}} | |||
|{{ItemTable2|Light Armor}} | |||
||20% | |||
|- | |||
|{{ItemTable2|Guard Keycard}} | |||
|{{ItemTable2|Flashlight}} | |||
||20% | |||
|- | |||
|{{ItemTable2|5.56x45mm}}(40 Rounds) | |||
|{{ItemTable2|Combat Armor}} | |||
||10% | |||
|} | |||
<br clear=all> | <br clear=all> | ||
== | ==Elevator Systems== | ||
{{ZoneImage|ImageName=ElevA|October=HalloweenElvA|FileType=.jpg|description=Elevator System A}} | |||
{{ZoneImage|ImageName=ElevB|October=HalloweenElvB|FileType=.jpg|description=Elevator System B}} | |||
The '''Elevator Systems''' act as the connection between Light Containment Zone and Heavy Containment Zone. There are two Elevator Systems found in game. Those being Elevator System A and Elevator System B. The giant screen in the back of the room shows the current status of the [[Decontamination Process]] of Light Containment Zone. | |||
{{ | |||
| | |||
| | |||
| | |||
}} | |||
The ''' | |||
SCP-244-B will never spawn in either elevator system. | |||
{{Related|Soundtrack}} | |||
{{multi-listen start}} | |||
{{multi-listen item|filename=The Waiting Game.mp3|title=Elevator Music|description=}} | |||
{{multi-listen end}} | |||
<br clear=all> | |||
==Entrance Zone Checkpoints== | |||
{{ZoneImage|ImageName=HCZSide|October=HalloweenHCZSide|description=Overview of the room (Heavy Containment Zone Side)}} | |||
{{ZoneImage|ImageName=EZSide|October=HalloweenEZSide|description=Overview of the room (Entrance Side).}} | |||
{{ZoneImage|ImageName=SideWindow|October=HalloweenCheckpointSideArea|description=The window viewing the Heavy Containment Zone side}} | |||
''' | The '''Entrance Zone Checkpoints''' are two checkpoints that connect Heavy Containment Zone to [[Entrance Zone]]. A keycard with Administrative Access 1 is required to open the checkpoint. After ten seconds, the checkpoint doors will close. | ||
On the Entrance Zone side is another Keycard door that requires Administrative Access 1. Behind this door is a small office area that has a Weapon Locker Type 21. This area can be used to check what is on the other side of the checkpoint by using the window found near the end. The window can be broken to open fire upon any threat in view. | |||
'''Guaranteed Spawns:''' | |||
[[ | *[[Weapon Locker Type 21]] | ||
[[ | **Will not contain [[Flashbang Grenade]]s, [[Heavy Armor]], or [[High-Explosive Grenade]]s | ||
[[ | |||
[[ | |||
<br clear=all> | |||
==Junk Room== | |||
{{ZoneImage|ImageName=JunkTop|October=HalloweenJunkEntrance|FileType=.jpg|description=Junk Room entrance}} | |||
{{ZoneImage|ImageName=JunkTop2|October=HalloweenJunkAlt|FileType=.jpg|description=Other entrance}} | |||
The '''Junk Room''' is a three way intersection with a wall of boxes cutting off the center of the room. While two of the entrances of the room are close enough to be unaffected by this. The other entrance can not be reached without going through a cramped side area. SCP-173 can use their Blink ability to reach the yellow pipes on the ceiling. | |||
'''Possible Spawns:''' | '''Possible Spawns:''' | ||
* [[Experimental Weapon Locker]] | |||
* [[Shelving Unit]] | |||
<br clear=all> | <br clear=all> | ||
== | ==Pipe Room== | ||
{{ZoneImage|ImageName=PipeOverview|October=HalloweenPipeEntrance|description=Pipe Room entrance}} | |||
{{ZoneImage|ImageName=PipeOtherSide|October=HalloweenPipeAlt|description=Other entrance}} | |||
{{ZoneImage|ImageName=PipeSide|October=HalloweenPipeSide|description=The side hallway}} | |||
The '''Pipe Room''' is a straight hallway with a wall of pipes cutting through the center of the room. There are two paths around the wall of pipes. A cramped hallway that can be accessed from both sides of the room or by dropping down from the upper level. The cramped hallway has a lootable Shelving Unit along one of its walls. The stairs to reach the upper level can only be accessed by one side of the room. A [[Bulletproof Locker №7]] can spawn up here. The upper area can be used as an ambushing position. | |||
{{ | |||
| | |||
| | |||
}} | |||
''' | |||
'''Possible Spawns:''' | |||
* [[Bulletproof Locker №7]] | |||
* [[Shelving Unit]] | |||
<br clear=all> | |||
The | ==Project Segmentum Hallway== | ||
{{ZoneImage|ImageName=ProjectSegOverview|October=HalloweenSegOverview|description=Lower hallway overview}} | |||
{{ZoneImage|ImageName=ProjectSegFence|October=HalloweenSegStorage|description=Fenced area}} | |||
{{ZoneImage|ImageName=ProjectSegOutLab|October=HalloweenSegOutside|description=Outside the lab}} | |||
{{ZoneImage|ImageName=ProjectSegLab|October=HalloweenSegLab|description=Upper lab}} | |||
{{ZoneImage|ImageName=ProjectSegTestChamber|October=HalloweenSegMicro|description=Testing chamber}} | |||
The '''Project Segmentum Hallway''' is a straight hallway with an upper room leading to a laboratory for [[Micro H.I.D.|Project Segmentum]]. The lower section of the hallway contains a small side area with shelves and a Bulletproof Locker №7 spawn. This area is slightly fenced off allowing it to be used for cover. | |||
[[ | <div style="white-space:normal;"> | ||
The upper area of the room is accessed by using the stairs. This area is the laboratory with notes and an audio recording detailing about Project Segmentum. The island in the room contains a Surface Access Pass while the back of the room has a [[First Aid Cabinet]]. Off to the side is a Keycard locked door that requires Security Access 3 to open. | |||
</div> | |||
Behind the Keycard locked door is the Micro H.I.D. sitting on its pedestal. This area acts as the testing chamber for the weapon when used by Site-02 staff. | |||
{{multi-listen start}} | |||
{{multi-listen item|filename=SegmentumTape.mp3|title=Audio Log}} | |||
{{multi-listen end}} | |||
'''Guaranteed Spawns:''' | '''Guaranteed Spawns:''' | ||
* | *Inside the testing chamber | ||
**[[ | ** [[First Aid Cabinet]] | ||
* | ** [[Micro H.I.D.]] | ||
** [[ | *Outside the testing chamber | ||
** [[First Aid Cabinet]] | |||
** [[Keycard#Unique Devices|Surface Access Pass]] | |||
'''Possible Spawns:''' | '''Possible Spawns:''' | ||
* | *Lower hallway | ||
** [[Bulletproof Locker №7]] | ** [[Bulletproof Locker №7]] | ||
** [[Emergency Power Station]] | |||
<br clear=all> | |||
==SCP-049's & SCP-173's Containment Area== | |||
{{ZoneImage|ImageName=LoadingBay125|October=Halloween049173Entrance|description=Lower Hallway Overview}} | |||
{{ZoneImage|ImageName=049173Elevator|October=Halloween049173ElvUpper|description=Upper Elevator Hallway}} | |||
{{ZoneImage|ImageName=049Outside|October=Halloween049CellOut|description=Outside SCP-049's cell}} | |||
{{ZoneImage|ImageName=049Containment|October=Halloween049Cell|description=SCP-049's Containment Cell}} | |||
{{ZoneImage|ImageName=Updated049Armory|October=Halloween049Armory|description=The armory next to SCP-049's cell}} | |||
{{ZoneImage|ImageName=173Outside|October=Halloween173Out|description=Outside SCP-173's cell}} | |||
{{ZoneImage|ImageName=173Containment|October=Halloween173Cell|description=SCP-173's Containment Cell}} | |||
'''SCP-049's & SCP-173's Containment Area''', also known as '''Site-02 Loading Bay 125''' or '''Subsection-05-2''', is a two floor hallway that requires an elevator to travel between the two. The lower level of the room contains a fenced off area and a small hiding place near one of the entrances to the hallway. | |||
The upper floor of the room is the containment area. Upon leaving the elevator the player is greeted to a hallway. Following the left path leads the player to [[SCP-049]]'s Containment cell and the right leads to SCP-173's Containment cell. Both SCPs spawn in their respective containment cells. | |||
SCP-049's Containment Area contains a dead [[Facility Guard]] with an [[Adrenaline]] on the ground next to them. A blood trail from the corpse leads to a Keycard door that requires Security Access 2 to open. Inside is an armory with a [[FSP-9]] spawn and a breakable window that leads to SCP-049's spawn. A MTF-E11-SR Rack or Weapon Locker Type 21 may spawn inside this armory. Inside SCP-049's chamber is a Zone Manager Keycard. Next to SCP-049's chamber is a pathway that leads to SCP-173's Containment Chamber. | |||
Outside of SCP-173's spawn is dead Scientist with a Surface Access Pass. Across the cell is a possible Bulletproof Locker №7 spawn. Going further down this way will lead the player to back to the elevator. | |||
SCP-244-B will never spawn in this room. | |||
{{Related|Soundtrack}} | |||
{{multi-listen start}} | |||
{{multi-listen item|filename=The Waiting Game.mp3|title=Elevator Music|description=}} | |||
{{multi-listen end}} | |||
'''Guaranteed Spawns:''' | '''Guaranteed Spawns:''' | ||
* | *Outside the armory | ||
** [[Keycard| | ** [[Adrenaline]] (Next to the dead Facility Guard) | ||
** [[Keycard#Unique Devices|Surface Access Pass]] (Next to the dead Scientist) | |||
** [[Keycard|Zone Manager Keycard]] (Inside SCP-049's cell) | |||
*Inside the Armory | |||
** [[FSP-9]] | |||
** [[Workstation]] | |||
'''Possible Spawns:''' | '''Possible Spawns:''' | ||
*Outside the | *Outside the armory | ||
* [[Bulletproof Locker №7]] | **[[Bulletproof Locker №7]] (Across from SCP-173's cell) | ||
* [[First Aid Cabinet]] | **[[Emergency Power Station]] (Lower hallway) | ||
* [[ | **[[First Aid Cabinet]] (Lower hallway) | ||
* [[ | *Inside the armory | ||
**[[MTF-E11-SR Rack]] | |||
**[[Weapon Locker Type 21]] | |||
<br clear=all> | <br clear=all> | ||
==SCP-079's Containment Area== | ==SCP-079's Containment Area== | ||
{{ZoneImage|ImageName=079Top|October=Halloween079Entrace|description=Entrance to the room}} | |||
{{ZoneImage|ImageName=079Connector|October=Halloween079Connector|description=The short hallway leading to the chamber}} | |||
{{ZoneImage|ImageName=079Chamber2|October=Halloween079Chamber|FileType=.jpg|description=SCP-079's chamber}} | |||
{{ZoneImage|ImageName=079ArmoryHCZ|October=Halloween079Armory|description=The armory in SCP-079's chamber}} | |||
{{ | |||
| | |||
| | |||
The | |||
'''SCP-079's Containment Area''' is an end room that contains the location of [[SCP-079]]. The gates to this room are locked until all three Emergency Power Stations have been engaged. Once this happens the doors will automatically open. Though they can be closed and opened again with a Keycard that has Containment Access Tier 2. | |||
Inside the room is a short series of stairs that lead to the locked gate. Behind this gate is a short hallway with a Shelving Unit and another gate. Behind this gate is the chamber of SCP-079. Inside the chamber is an armory to the right of the entrance. Full of high tier loot and a button that recontains SCP-079. Going down the set of stairs leads to a bottom area where SCP-079 is fenced off. SCP-079 can not be damaged by any player means besides the dedicated recontainment button. Along the backwall of this bottom area is an plaque dedicated to the players who took a large and active part in the ARG Event. | |||
SCP-244-B will never spawn in this room. | |||
'''Guaranteed Spawns:''' | '''Guaranteed Spawns:''' | ||
*In the armory | *In the hallway between the gates: | ||
**[[Shelving Unit]] | |||
*In the armory | |||
**Firearms: | **Firearms: | ||
*** [[Crossvec]] | *** [[Crossvec]] | ||
| Line 282: | Line 286: | ||
*** 3 [[Heavy Armor]]s | *** 3 [[Heavy Armor]]s | ||
**Medical Items: | **Medical Items: | ||
*** 2 [[Adrenaline]]s | |||
*** 3 [[First Aid Kit]]s | *** 3 [[First Aid Kit]]s | ||
**Other: | **Other: | ||
*** | *** 3 [[Coin]]s (Hidden on top of an MTF-E11-SR Rack) | ||
*** [[Keycard|Facility Manager Keycard]] | |||
*** 2 [[Flashlight]]s | *** 2 [[Flashlight]]s | ||
*** 2 [[MTF-E11-SR Rack]]s | *** 2 [[MTF-E11-SR Rack]]s | ||
*** 2 [[ | ****1 contains the [[FR-MG-0]] | ||
****Neither contain [[High-Explosive Grenade]]s | |||
*** 2 [[Radio]]s | |||
*** [[Workstation]] | *** [[Workstation]] | ||
'''Possible Spawns:''' | '''Possible Spawns:''' | ||
*Outside the containment chamber | *Outside the containment chamber | ||
** [[First Aid Cabinet]] (up to two) | ** [[First Aid Cabinet]] (up to two) | ||
** [[Emergency Power Stations|Emergency Power Station]] | ** [[Emergency Power Stations|Emergency Power Station]] | ||
<br clear=all> | |||
==SCP-096's Containment Area== | |||
{{ZoneImage|ImageName=Broken096Outer|October=Halloween096Entrance|description=Entrance to the room}} | |||
{{ZoneImage|ImageName=Broken096Inner|October=Halloween096Cell|description=SCP-096's Containment Cell}} | |||
'''SCP-096's Containment Area''' is a small end room that contains [[SCP-096]]. The door to this room will always be the standard small door. The entrance of the room has multiple possible structure spawns such as First Aid Cabinets, Emergency Power Stations and Workstations. SCP-096 will spawn in this entrance area as opposed to their cell. | |||
The back of the room has a Keycard locked door that requires Containment Access 2 to open. The door is broken and will not open all the way. A MTF Operative Keycard can be grabbed through the door if opened. A [[.44 Revolver]] may also spawn in the chamber. | |||
SCP-244-B will never spawn in this room. | |||
'''Guaranteed Spawns:''' | |||
*Inside the containment chamber | |||
**[[Keycard|MTF Operative Keycard]] | |||
'''Possible Spawns:''' | |||
*Inside the containment chamber | |||
**[[.44 Revolver]] | |||
*Outside the containment chamber | |||
** [[Bulletproof Locker №7]] | |||
** [[First Aid Cabinet]] | |||
** [[Emergency Power Station]] | |||
** [[Workstation]] | |||
<br clear=all> | <br clear=all> | ||
==SCP-106's Containment Area== | ==SCP-106's Containment Area== | ||
{{ZoneImage|ImageName=106Box|October=Halloween106Overview|description=SCP-106's Containment Area Overview}} | |||
{{ZoneImage|ImageName=106DoorUpdated|October=Halloween106Door|description=One of the entrances to the lower observation room}} | |||
{{ZoneImage|ImageName=106Inside|October=Halloween106Inside|description=Inside the observation room}} | |||
{{ | |||
| | |||
| | |||
| | |||
}} | |||
'''SCP-106's Containment Area''' is a large end room that contains [[SCP-106]]. The door to this room will always be the standard small door. The entrance of the room contains a large open space with magnets in the center of the room. The magnets contain walkways that can be used by the player. Floating above these magnets is SCP-106's containment cell. Below the magnets is a pit that will instantly kill anything that falls in. | |||
The | In the back of the room is an observation chamber for SCP-106. The room has two entrances with the left one having a possible Bulletproof Locker №7 spawn next to it. Inside the observation chamber is some clutter and a MTF Operative Keycard spawn. SCP-106 will spawn in this area. | ||
Inside | A 2nd observation room exists that can only be accessed with noclip. Inside this room is a whiteboard with signatures from the entire Northwood Studio's development team at the time of 14.0.0's development. | ||
SCP-244-B will never spawn in this room. | |||
'''Guaranteed Spawns:''' | '''Guaranteed Spawns:''' | ||
*On the | *On a box inside the lower observation room: | ||
** [[Coin]] | ** [[Coin]] | ||
** [[Keycard|MTF Sergeant Keycard]] | |||
'''Possible Spawns:''' | '''Possible Spawns:''' | ||
*Inside the control room: | |||
**[[.44 Revolver]] | |||
*Outside the control room: | *Outside the control room: | ||
** [[Bulletproof Locker №7]] | |||
** [[First Aid Cabinet]] | ** [[First Aid Cabinet]] | ||
<br clear=all> | |||
==SCP-127's Containment Area== | |||
{{ZoneImage|ImageName=127Body|October=Halloween127Overview|description=SCP-127's Containment Area Overview}} | |||
{{ZoneImage|ImageName=127Lab1|October=Halloween127Chamber|description=Testing chamber}} | |||
{{ZoneImage|ImageName=127127|October=Halloween127127|description=Weapon Locker 7-C}} | |||
'''SCP-127's Containment Area''' is a three-way hallway that contains [[SCP-127]]. In the middle of the room is a dead Facility Guard that was torn apart by SCP-4088. A recording device can be found on the ground nearby. When played the sounds of the guard screaming and SCP-4088 can be heard. | |||
In the corner of the room is a small testing chamber that hold SCP-127. Unbreakable glass is found inside this small testing area and various lab equipment. A tuna sandwich can be seen sitting on the counter. In the back of the room is Weapon Locker 7-C that contains SCP-127. It requires a Keycard with Containment Access 3 to open. | |||
{{multi-listen start}} | |||
{{multi-listen item|filename=Mikel_Dies_to_a_Piano.mp3|title=Audio Log}} | |||
{{multi-listen end}} | |||
'''Guaranteed Spawns:''' | |||
*Inside its locker | |||
** [[SCP-127]] | |||
<br clear=all> | <br clear=all> | ||
== | ==SCP-939's Containment Area== | ||
{{ZoneImage|ImageName=939LabGenSpot|October=Halloween939LabGen|description=Left Entrance}} | |||
{{ | {{ZoneImage|ImageName=939LabSign|October=Halloween939Entrance|description=Right Entrance}} | ||
| | {{ZoneImage|ImageName=939Lab|October=Halloween939Lab|description=An overview of the lab}} | ||
| | {{ZoneImage|ImageName=939Cryo|October=Halloween939Cryo|description=The cryopod that SCP-939 spawns in}} | ||
| | '''SCP-939's Containment Area''' is a corner hallway that acts as the spawn location of SCP-939. The area contains an entire laboratory of equipment and chemicals for the studying of SCP-939. The doors to this room will always be the standard small doors. | ||
}} | |||
The room is divided into three parts, the entrance, the laboratory, and the Cryo Storage. The entrance area has nothing of value and simply acts as the connection to the rest of Heavy Containment Zone via two doors, both of which have water pipes near them. The laboratory is marked by a sign warning individuals the area is used for the containment of a Keter level SCP. | |||
The laboratory itself contains spawn points for structures such as [[Standard Locker]]s and [[First Aid Cabinet]]s. The outer walls of the laboratory contain various unopenable storage containers, counters with lab equipment, unopenable cabinets and a whiteboard. The middle of the room contains an island with various lab equipment on it. The scale found on the island is intractable, any item or ragdoll that lands on top of it will have its weight measured. If multiple objects are on the scale all at once, the scale will add up all of their weight. This includes the second scale in the room that has an unmovable prop on top of it.<br> | |||
The weight of items displayed by the scale is not 1:1 with the item's actual weight due to rounding. Any item that weighs 5kg or more will display "Err" on the scale. Putting the Micro H.I.D. on the scale will display "Next time eat a salad". | |||
Connected to the laboratory, is the Cryo Storage Area and is where SCP-939 will spawn at the start of the round. An [[Emergency Power Stations|Emergency Power Station]] can spawn next to the Cryo Pod. | |||
SCP-244-B will never spawn in this room. | |||
'''Possible Spawns:''' | '''Possible Spawns:''' | ||
* [[First Aid Cabinet]] | *Main Lab: | ||
* [[Emergency Power Stations|Emergency Power Station]] | ** [[First Aid Cabinet]] | ||
** [[Standard Locker]] | |||
*Hallway: | |||
** [[Emergency Power Stations|Emergency Power Station]] | |||
<br clear=all> | |||
==Server Room== | |||
{{ZoneImage|ImageName=ServersTop|October=HalloweenServerTop|description=Servers Room entrance}} | |||
{{ZoneImage|ImageName=ServersTopStairs|October=HalloweenServerOtherEntr|description=Other entrance}} | |||
{{ZoneImage|ImageName=ServersTopElevator|October=HalloweenServerElvTop|description=The elevator from the upper floor}} | |||
{{ZoneImage|ImageName=ServersBotElevator|October=HalloweenServerElvBottom|description=The elevator from the bottom floor}} | |||
{{ZoneImage|ImageName=ServersBotOverview|October=HalloweenServerBottom|description=An overview of the bottom floor}} | |||
{{ZoneImage|ImageName=ServersBotLocker2|October=HalloweenServerSmallRoom|description=The small side room on the bottom floor with a Standard Locker}} | |||
The '''Server Room''' is a straight hallway with one of the doors inside the room being blocked off by a shelf. Players may have to travel through the low section of the room and use the elevator depending on which side of the room they enter from. The elevator will crush and instantly kill any player that is under it. The upper section of the room is full of posters and parts of the E.P.A.S System. Which acted as a precursor to the [[C.A.S.S.I.E.]] System. An unbreakable glass is located on this upper floor that SCP-106 can walk through. Near one of the entrances to the room is a grate that can be used to see if the elevator is currently in use. | |||
The bottom section of the room contains many props that break line of sight and a small closed off section with a Standard Locker. This can be used to break up a chase from an SCP. An Emergency Power Station can spawn outside this smaller room. | |||
SCP-244-B will never spawn in this room. | |||
'''Possible Spawns:''' | |||
* [[Bulletproof Locker №7]] | |||
* [[Emergency Power Station]] | |||
* [[Standard Locker]] | |||
<br clear=all> | <br clear=all> | ||
= | ==Tesla Gate Hallway== | ||
{{ZoneImage|ImageName=TeslaGateHallway|October=HalloweenTeslaOff|description=Tesla Gate Hallway Overview}} | |||
{{ZoneImage|ImageName=TeslaGateHallwayWarm|October=HalloweenTeslaCharge|description=Tesla Gate Warming Up}} | |||
== | {{ZoneImage|ImageName=TeslaGateHallwayZap|October=HalloweenTeslaFire|description=Tesla Gate Firing}} | ||
The '''Tesla Gate Hallway''' is a straight hallway with a Tesla Gate in the middle of the room. Approaching the gate will warm up the gate. This sound is loud and can be heard across multiple rooms. Getting closer will cause the Tesla Gate to start zapping. Touching this wall of electricity will deal to the player for three ticks. The amount of damage for each tick is a random number from 200 to 300. SCP-079 can force a Tesla Gate to zap with a short cooldown. If SCP-079 is currently using a camera in a room with a Tesla Gate it will start warming up. | |||
Up to three Tesla Gates can spawn in the zone and they will never spawn connected to each other. SCP-244-B will never spawn in this room. | |||
<br clear=all> | <br clear=all> | ||
== | ==Testroom== | ||
{{ZoneImage|ImageName=TestroomCatwalk|October=HalloweenTestRoomOverview|description=Test Room Overview}} | |||
{{ZoneImage|ImageName=TestroomOffice|October=HalloweenTestRoomSide|description=Office side area}} | |||
{{ZoneImage|ImageName=TestroomPC|October=HalloweenTestRoomMonitor|description=The table full of documents about Site-45}} | |||
The '''Testroom''' is a straight hallway with a giant bottomless pit in the center of the room. Anything that falls in the pit will be killed instantly. Along the wall of the room is a catwalk with a Bulletproof Locker №7 and opposite to that is an office. | |||
Inside the office is documents detailing about the fall of Site-45. This room has a 50% of spawning either a Scientist Keycard or COM-18 with a box of ammo. | |||
== | {{multi-listen start}} | ||
[[ | {{multi-listen item|filename=S45_Theta5Audio.mp3|title=Audio Log}} | ||
[[ | {{multi-listen end}} | ||
'''Guaranteed Spawns:''' | |||
*In the office (50% of either spawning) | |||
** [[COM-18]] + 9x19mm (30 Rounds) | |||
** [[Keycard|Scientist Keycard]] | |||
'''Possible Spawns:''' | '''Possible Spawns:''' | ||
*[[Workstation]] | *On the walkway | ||
** [[Bulletproof Locker №7]] | |||
** [[First Aid Cabinet]] | |||
** [[Workstation]] | |||
** [[Emergency Power Stations|Emergency Power Station]] | |||
<br clear=all> | |||
< | ==Hallways== | ||
<gallery mode="packed" widths=400px heights=138px> | |||
VentHallway.png|A Straight Hallway with a vent | |||
BathroomsWall.png|The Bathroom Hallway | |||
BathroomsPipe.png|The Bathroom Hallway (Alt View) | |||
NewHCZCorner.png|Corner Hallway | |||
HCZIntersection.png|T-Intersection | |||
HCZFourway.png|X-Intersection | |||
</gallery> | |||
'''Possible Spawns:''' | |||
[[ | *[[Workstation]] (T-Intersection) | ||
<br clear=all> | <br clear=all> | ||
=Map Layouts= | =Map Layouts= | ||
There are | There are ten possible map layouts of Heavy Containment Zone. Special Rooms are randomized in these layouts, HCZ/EZ Checkpoint are marked via the orange room labeled EZ, this room is two hallways long. | ||
SCP-079 map rotates both HCZ and EZ on its display by 180°, these images are based off how the layouts appear in the game files and not SCP-079's map.<br> | |||
Below are all the possible map layouts.<br> | Below are all the possible map layouts.<br> | ||
Credit: | Credit: | ||
*Mooshua - | *Mooshua - Room Icons | ||
<div class="round-tabber"> | <div class="round-tabber"> | ||
<tabber> | <tabber> | ||
Layout #1= | |||
<center> | <center> | ||
[[File: | [[File:NewHCZ1.png]] | ||
|-| | |-| | ||
Layout #2= | |||
[[File:NewHCZ2.png]] | |||
[[File:Layout | |-| | ||
Layout #3= | |||
[[File:NewHCZ3.png]] | |||
|-| | |||
Layout #4= | |||
[[File:NewHCZ4.png]] | |||
|-| | |||
Layout #5= | |||
[[File:NewHCZ5.png]] | |||
|-| | |||
Layout #6= | |||
[[File:NewHCZ6.png]] | |||
|-| | |||
Layout #7= | |||
[[File:NewHCZ7.png]] | |||
|-| | |-| | ||
Layout #8= | |||
[[File:NewHCZ8.png]] | |||
[[File: | |||
|-| | |-| | ||
Layout #9= | |||
[[File:NewHCZ9.png]] | |||
[[File: | |||
|-| | |-| | ||
Layout #10= | |||
[[File:NewHCZ10.png]] | |||
[[File: | </tabber> | ||
</div> | |||
=Related Achievements= | |||
{{Achievements}} | |||
=Trivia= | =Trivia= | ||
* | *The Testroom servered as SCP-939's spawn before the [[Updates/12.0.0|12.0.0]] Mimicry Update. | ||
* | **The room did not have a death pit like it does now. Instead, the side area contained a series of ramps that led to the bottom of the room, which is where SCP-939-53 and SCP-939-89 could spawn. | ||
**The | **The side area was replaced with a small office and the bottom became a death pit. The small office was an idea suggested by a patron who created a mock up render. | ||
[[Category:Zones]] | [[Category:Zones]] | ||
{{Locations Navbox}} | {{Locations Navbox}} | ||
Latest revision as of 17:50, 26 April 2026
Subsection-05 of Site-02, also known as the Heavy Containment Subsection, or Heavy Containment Zone, is one of four zones found in SCP: Secret Laboratory. The zone contains several important features such as the Micro H.I.D., the Alpha Warhead Silo, and the Emergency Power Stations.
Operational Guide Overview
The Heavy Containment Subsection, also known as Subsection-05, is one of Site-02’s most secure subsections. Dedicated to the secure containment of numerous dangerous Keter and Euclid class anomalies, such as instances of SCP-939 and SCP-106. The Heavy Containment Subsection contains many tools that security may utilize in the containment and security of anomalies.

Subsection-05 is composed of P-S-3 electrostatic tesla gates and additional subsections. These include Subsection-05-1 and Subsection-05-2, both with various uses ranging from dedicated SCP-containment to the on-site nuclear warhead.

___
“Another log. May as well keep some of my thoughts collected at least. Termination tests for 096 are going nowhere. Nobody can figure out how to snap, chip, or otherwise break its bone structure. Project Segmentum isn't getting any better, it's still locked up in its service locker. Techies are still trying to figure out some new method of delivering its energy supply. The only thing that does happen on the regular is 106’s containment breaches. Either I'm missing out on the fun stuff or our work here is entirely pointless.”

-Charles H. Goodwin, Analyst, Site-02
Description
The Heavy Containment Zone is an industrial zone with exposed pipes and cargo crates scattered around the zone. These props often serve as a connection between the various hallways found in the zone. All playable SCPs will spawn in Heavy Containment Zone besides the Remote Admin exclusive SCP-3114.
Up to 60% of connectors between rooms will have a Standard Door with a minimum of 50%. These include connections that are guaranteed to have Standard Doors. Some room connectors may spawn with a massive Bulkhead instead. These doors will instantly kill any Humans crushed between them. SCPs will only take 200 damage when crushed. Up to six Bulkheads can spawn in the zone with a minimum of four.
Exclusive to Heavy Containment Zone are the Emergency Power Stations and Experimental Weapon Lockers. SCP-244-B has a 35% to spawn in a random room located within Heavy Containment Zone. Around the zone are alarms in certain rooms that will blare under certain circumstances. The alarms will trigger for 20 seconds when a High-Explosive Grenade detonates nearby or when a player dies to an SCP, a Chaos Insurgent or a Class-D Personnel. The alarm can be heard up to three rooms away.
Related article: Soundtrack
Rooms of Interest
Rooms of Interest are special rooms found within a zone. These rooms contain loot, be a spawn point for players or have some environmental interaction. They easily stand out in appearance compared to the standard hallways. These rooms often only spawn once within the map with a few exceptions.
Alpha Warhead Silo


The Alpha Warhead Silo, also known as Subsection-05-1, is a three way hallway variant found in the zone. It contains two elevators that lead down to a lower section of the room that contains the Alpha Warhead. The elevators will crush and instantly kill any player that is under them.
The lower section of the room is broken into multiple sections. Such as a smaller back area that acts as an armory. There are multiple paths that can be taken within the silo, including two ventilation hallways that lead to the main chamber. The entrance of these are located near the left elevator.
The main area of the lower section contains a bottomless pit that instantly kills anything that falls down it. In the ceiling of the room is the Alpha Warhead. In the center of the room is the firing mechanism with a control panel. The lever can be flipped to either ready or disarm the warheads in Site-02. The red cancel button must be pressed if the detonation sequence is commencing to stop it. Next to the control panel is a dead Scientist with a COM-18 and a Surface Access Pass. Behind the Scientist is a series of pipes that each connect to the various warheads within Site-02.
Guaranteed Spawns:
Possible Spawns:
Acroamatic Abatement - Waterfall


The Acroamatic Abatement - Waterfall is an area of Heavy Containment Zone with the purpose of disposing anomalous waste such as SCP-173's fecal matter or SCP-939's amnestic vapor. The room acts a four way intersection and will always have standard doors for its connectors.
The center of the room is a giant water fall leading down to the pit. Any player who falls down the pit will be instantly killed.
A lower section within the room can be viewed from the above. This place can not be reached during normal gameplay. It is the location of one of many hidden capybaras in the game.
SCP-244-B can not spawn in this room.
Possible Spawns:
Acroamatic Abatement - Wayside Incinerator


The Acroamatic Abatement - Wayside Incinerator is a corner piece room with a fiery pit in the center of the room. The room acts as a disposal location within Site-02. Falling into the pit will instantly kill the player.
SCP-244-B can not spawn in this room.
Armory


The Armory is a three way intersection that contains a low tier armory in the center of the room. The three entrances to this room will always be the standard small door. The bottom of the room is a bottomless pit that will instantly kill anything that falls in.
The armory requires a Keycard with Security Access Tier 1 to open. Inside is a COM-18, a stockpile of ammo and a Workstation. A Bulletproof Locker №7 or First Aid Cabinet may spawn inside the armory.
Guaranteed Spawns:
- Inside the armory
- COM-18
- Flashlight
- Radio
- 9x19mm Ammo (210 Rounds)
- 5.56x45mm Ammo (120 Rounds)
Possible Spawns:
- Inside the armory:
- On the outside walls:
- First Aid Cabinet (up to two)
- Emergency Power Station
Deep Corner

Deep Corner is a corner type hallway found throughout most of the zone. Around 90% of corners in the zone are this variant. The room contains a small group of boxes along a wall. This can serve as a hiding place from threats or to take cover during gun fire. Randomized loot will spawn on one of the boxes in the room.
Possible Spawns:
On top of the box:
| Loot | Chance | |
|---|---|---|
 Flashlight Flashlight
|
 Radio Radio  Zone Manager Keycard Zone Manager Keycard
|
30% |
 9x19mm (30 Rounds) 9x19mm (30 Rounds)
|
20% | |
| 9x19mm (30 Rounds)
|
 Light Armor Light Armor
|
20% |
| Flashlight
|
20% | |
 5.56x45mm (40 Rounds) 5.56x45mm (40 Rounds)
|
 Combat Armor Combat Armor
|
10% |
Elevator Systems


The Elevator Systems act as the connection between Light Containment Zone and Heavy Containment Zone. There are two Elevator Systems found in game. Those being Elevator System A and Elevator System B. The giant screen in the back of the room shows the current status of the Decontamination Process of Light Containment Zone.
SCP-244-B will never spawn in either elevator system.
Related article: Soundtrack
Entrance Zone Checkpoints


The Entrance Zone Checkpoints are two checkpoints that connect Heavy Containment Zone to Entrance Zone. A keycard with Administrative Access 1 is required to open the checkpoint. After ten seconds, the checkpoint doors will close.
On the Entrance Zone side is another Keycard door that requires Administrative Access 1. Behind this door is a small office area that has a Weapon Locker Type 21. This area can be used to check what is on the other side of the checkpoint by using the window found near the end. The window can be broken to open fire upon any threat in view.
Guaranteed Spawns:
- Weapon Locker Type 21
- Will not contain Flashbang Grenades, Heavy Armor, or High-Explosive Grenades
Junk Room


The Junk Room is a three way intersection with a wall of boxes cutting off the center of the room. While two of the entrances of the room are close enough to be unaffected by this. The other entrance can not be reached without going through a cramped side area. SCP-173 can use their Blink ability to reach the yellow pipes on the ceiling.
Possible Spawns:
Pipe Room


The Pipe Room is a straight hallway with a wall of pipes cutting through the center of the room. There are two paths around the wall of pipes. A cramped hallway that can be accessed from both sides of the room or by dropping down from the upper level. The cramped hallway has a lootable Shelving Unit along one of its walls. The stairs to reach the upper level can only be accessed by one side of the room. A Bulletproof Locker №7 can spawn up here. The upper area can be used as an ambushing position.
Possible Spawns:
Project Segmentum Hallway


The Project Segmentum Hallway is a straight hallway with an upper room leading to a laboratory for Project Segmentum. The lower section of the hallway contains a small side area with shelves and a Bulletproof Locker №7 spawn. This area is slightly fenced off allowing it to be used for cover.
The upper area of the room is accessed by using the stairs. This area is the laboratory with notes and an audio recording detailing about Project Segmentum. The island in the room contains a Surface Access Pass while the back of the room has a First Aid Cabinet. Off to the side is a Keycard locked door that requires Security Access 3 to open.
Behind the Keycard locked door is the Micro H.I.D. sitting on its pedestal. This area acts as the testing chamber for the weapon when used by Site-02 staff.
Guaranteed Spawns:
- Inside the testing chamber
- Outside the testing chamber
Possible Spawns:
- Lower hallway
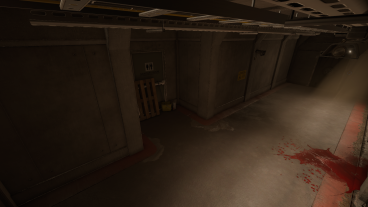
SCP-049's & SCP-173's Containment Area


SCP-049's & SCP-173's Containment Area, also known as Site-02 Loading Bay 125 or Subsection-05-2, is a two floor hallway that requires an elevator to travel between the two. The lower level of the room contains a fenced off area and a small hiding place near one of the entrances to the hallway.
The upper floor of the room is the containment area. Upon leaving the elevator the player is greeted to a hallway. Following the left path leads the player to SCP-049's Containment cell and the right leads to SCP-173's Containment cell. Both SCPs spawn in their respective containment cells.
SCP-049's Containment Area contains a dead Facility Guard with an Adrenaline on the ground next to them. A blood trail from the corpse leads to a Keycard door that requires Security Access 2 to open. Inside is an armory with a FSP-9 spawn and a breakable window that leads to SCP-049's spawn. A MTF-E11-SR Rack or Weapon Locker Type 21 may spawn inside this armory. Inside SCP-049's chamber is a Zone Manager Keycard. Next to SCP-049's chamber is a pathway that leads to SCP-173's Containment Chamber.
Outside of SCP-173's spawn is dead Scientist with a Surface Access Pass. Across the cell is a possible Bulletproof Locker №7 spawn. Going further down this way will lead the player to back to the elevator.
SCP-244-B will never spawn in this room.
Related article: Soundtrack
Guaranteed Spawns:
- Outside the armory
- Adrenaline (Next to the dead Facility Guard)
- Surface Access Pass (Next to the dead Scientist)
- Zone Manager Keycard (Inside SCP-049's cell)
- Inside the Armory
Possible Spawns:
- Outside the armory
- Bulletproof Locker №7 (Across from SCP-173's cell)
- Emergency Power Station (Lower hallway)
- First Aid Cabinet (Lower hallway)
- Inside the armory
SCP-079's Containment Area


SCP-079's Containment Area is an end room that contains the location of SCP-079. The gates to this room are locked until all three Emergency Power Stations have been engaged. Once this happens the doors will automatically open. Though they can be closed and opened again with a Keycard that has Containment Access Tier 2.
Inside the room is a short series of stairs that lead to the locked gate. Behind this gate is a short hallway with a Shelving Unit and another gate. Behind this gate is the chamber of SCP-079. Inside the chamber is an armory to the right of the entrance. Full of high tier loot and a button that recontains SCP-079. Going down the set of stairs leads to a bottom area where SCP-079 is fenced off. SCP-079 can not be damaged by any player means besides the dedicated recontainment button. Along the backwall of this bottom area is an plaque dedicated to the players who took a large and active part in the ARG Event.
SCP-244-B will never spawn in this room.
Guaranteed Spawns:
- In the hallway between the gates:
- In the armory
- Firearms:
- Grenades:
- Ammo:
- 9x19mm (105 Rounds)
- Body armors:
- Medical Items:
- Other:
- 3 Coins (Hidden on top of an MTF-E11-SR Rack)
- Facility Manager Keycard
- 2 Flashlights
- 2 MTF-E11-SR Racks
- 1 contains the FR-MG-0
- Neither contain High-Explosive Grenades
- 2 Radios
- Workstation
Possible Spawns:
- Outside the containment chamber
- First Aid Cabinet (up to two)
- Emergency Power Station
SCP-096's Containment Area


SCP-096's Containment Area is a small end room that contains SCP-096. The door to this room will always be the standard small door. The entrance of the room has multiple possible structure spawns such as First Aid Cabinets, Emergency Power Stations and Workstations. SCP-096 will spawn in this entrance area as opposed to their cell.
The back of the room has a Keycard locked door that requires Containment Access 2 to open. The door is broken and will not open all the way. A MTF Operative Keycard can be grabbed through the door if opened. A .44 Revolver may also spawn in the chamber.
SCP-244-B will never spawn in this room.
Guaranteed Spawns:
- Inside the containment chamber
Possible Spawns:
- Inside the containment chamber
- Outside the containment chamber
SCP-106's Containment Area


SCP-106's Containment Area is a large end room that contains SCP-106. The door to this room will always be the standard small door. The entrance of the room contains a large open space with magnets in the center of the room. The magnets contain walkways that can be used by the player. Floating above these magnets is SCP-106's containment cell. Below the magnets is a pit that will instantly kill anything that falls in.
In the back of the room is an observation chamber for SCP-106. The room has two entrances with the left one having a possible Bulletproof Locker №7 spawn next to it. Inside the observation chamber is some clutter and a MTF Operative Keycard spawn. SCP-106 will spawn in this area.
A 2nd observation room exists that can only be accessed with noclip. Inside this room is a whiteboard with signatures from the entire Northwood Studio's development team at the time of 14.0.0's development.
SCP-244-B will never spawn in this room.
Guaranteed Spawns:
- On a box inside the lower observation room:
Possible Spawns:
- Inside the control room:
- Outside the control room:
SCP-127's Containment Area


SCP-127's Containment Area is a three-way hallway that contains SCP-127. In the middle of the room is a dead Facility Guard that was torn apart by SCP-4088. A recording device can be found on the ground nearby. When played the sounds of the guard screaming and SCP-4088 can be heard.
In the corner of the room is a small testing chamber that hold SCP-127. Unbreakable glass is found inside this small testing area and various lab equipment. A tuna sandwich can be seen sitting on the counter. In the back of the room is Weapon Locker 7-C that contains SCP-127. It requires a Keycard with Containment Access 3 to open.
Guaranteed Spawns:
- Inside its locker
SCP-939's Containment Area


SCP-939's Containment Area is a corner hallway that acts as the spawn location of SCP-939. The area contains an entire laboratory of equipment and chemicals for the studying of SCP-939. The doors to this room will always be the standard small doors.
The room is divided into three parts, the entrance, the laboratory, and the Cryo Storage. The entrance area has nothing of value and simply acts as the connection to the rest of Heavy Containment Zone via two doors, both of which have water pipes near them. The laboratory is marked by a sign warning individuals the area is used for the containment of a Keter level SCP.
The laboratory itself contains spawn points for structures such as Standard Lockers and First Aid Cabinets. The outer walls of the laboratory contain various unopenable storage containers, counters with lab equipment, unopenable cabinets and a whiteboard. The middle of the room contains an island with various lab equipment on it. The scale found on the island is intractable, any item or ragdoll that lands on top of it will have its weight measured. If multiple objects are on the scale all at once, the scale will add up all of their weight. This includes the second scale in the room that has an unmovable prop on top of it.
The weight of items displayed by the scale is not 1:1 with the item's actual weight due to rounding. Any item that weighs 5kg or more will display "Err" on the scale. Putting the Micro H.I.D. on the scale will display "Next time eat a salad".
Connected to the laboratory, is the Cryo Storage Area and is where SCP-939 will spawn at the start of the round. An Emergency Power Station can spawn next to the Cryo Pod.
SCP-244-B will never spawn in this room.
Possible Spawns:
- Main Lab:
- Hallway:
Server Room


The Server Room is a straight hallway with one of the doors inside the room being blocked off by a shelf. Players may have to travel through the low section of the room and use the elevator depending on which side of the room they enter from. The elevator will crush and instantly kill any player that is under it. The upper section of the room is full of posters and parts of the E.P.A.S System. Which acted as a precursor to the C.A.S.S.I.E. System. An unbreakable glass is located on this upper floor that SCP-106 can walk through. Near one of the entrances to the room is a grate that can be used to see if the elevator is currently in use.
The bottom section of the room contains many props that break line of sight and a small closed off section with a Standard Locker. This can be used to break up a chase from an SCP. An Emergency Power Station can spawn outside this smaller room.
SCP-244-B will never spawn in this room.
Possible Spawns:
Tesla Gate Hallway


The Tesla Gate Hallway is a straight hallway with a Tesla Gate in the middle of the room. Approaching the gate will warm up the gate. This sound is loud and can be heard across multiple rooms. Getting closer will cause the Tesla Gate to start zapping. Touching this wall of electricity will deal to the player for three ticks. The amount of damage for each tick is a random number from 200 to 300. SCP-079 can force a Tesla Gate to zap with a short cooldown. If SCP-079 is currently using a camera in a room with a Tesla Gate it will start warming up.
Up to three Tesla Gates can spawn in the zone and they will never spawn connected to each other. SCP-244-B will never spawn in this room.
Testroom


The Testroom is a straight hallway with a giant bottomless pit in the center of the room. Anything that falls in the pit will be killed instantly. Along the wall of the room is a catwalk with a Bulletproof Locker №7 and opposite to that is an office.
Inside the office is documents detailing about the fall of Site-45. This room has a 50% of spawning either a Scientist Keycard or COM-18 with a box of ammo.
Guaranteed Spawns:
- In the office (50% of either spawning)
- COM-18 + 9x19mm (30 Rounds)
- Scientist Keycard
Possible Spawns:
- On the walkway
Hallways
-
 A Straight Hallway with a vent
 -
 The Bathroom Hallway
 -
 The Bathroom Hallway (Alt View)
 -
 Corner Hallway
 -
 T-Intersection
 -
 X-Intersection
Possible Spawns:
- Workstation (T-Intersection)
Map Layouts
There are ten possible map layouts of Heavy Containment Zone. Special Rooms are randomized in these layouts, HCZ/EZ Checkpoint are marked via the orange room labeled EZ, this room is two hallways long.
SCP-079 map rotates both HCZ and EZ on its display by 180°, these images are based off how the layouts appear in the game files and not SCP-079's map.
Below are all the possible map layouts.
Credit:
- Mooshua - Room Icons


Related Achievements
| Overcurrent | |
 |
Jump into a Tesla Gate while holding the Micro H.I.D. |
| Proceed With Caution | |
 |
Successfully pass through a Tesla Gate that SCP-079 is watching. |
| That was... close. | |
 |
Cancel the Alpha Warhead with 15 seconds or less remaining. |
Trivia
- The Testroom servered as SCP-939's spawn before the 12.0.0 Mimicry Update.
- The room did not have a death pit like it does now. Instead, the side area contained a series of ramps that led to the bottom of the room, which is where SCP-939-53 and SCP-939-89 could spawn.
- The side area was replaced with a small office and the bottom became a death pit. The small office was an idea suggested by a patron who created a mock up render.
| ||||||||||||||||||||