


From SCP: Secret Laboratory English Official Wiki
(Undo revision 7123 by Jamintheinfinite (talk)) Tag: Undo |
No edit summary |
||
| (111 intermediate revisions by 17 users not shown) | |||
| Line 1: | Line 1: | ||
<div style="display:none">{{LOCALDAY}}</div> | |||
'''Subsection-05''' of [[Site-02]], also known as the '''Heavy Containment Subsection''', or '''Heavy Containment Zone''', is one of four zones found in ''SCP: Secret Laboratory''. The zone contains several important features such as the [[Micro H.I.D.]], the [[Alpha_Warhead|Alpha Warhead Silo]], as well as the three [[Emergency Power Stations]]. | |||
__TOC__ | __TOC__ | ||
=Operational Guide Overview= | |||
{{OpGuide2}} | |||
Heavy Containment Zone | =Description= | ||
Heavy Containment Zone (HCZ) is one of four zones in [[Site-02]].<br> | |||
Placed below [[Light Containment Zone]] and located right next to [[Entrance Zone]], it is considered one of the most dangerous zones, as it is the spawn location for all the playable [[SCPs]]. | |||
Heavy Containment Zone is | Heavy Containment Zone is also the only zone affected by the [[Overcharge]] event, which is used to re-contain SCP-079. This event occurs after all 3 [[Emergency Power Stations]] have been activated, and the button in SCP-079's Containment Chamber is pushed (this will also occur when SCP-079 is the last SCP alive). | ||
Heavy Containment Zone contains a few important rooms that contain items that can aid a player in escaping or re-containing certain SCP. | |||
| Line 11: | Line 18: | ||
{{multi-listen item|filename=Doctors Lab.mp3|title=Heavy Containment Zone's Theme|description=}} | {{multi-listen item|filename=Doctors Lab.mp3|title=Heavy Containment Zone's Theme|description=}} | ||
{{multi-listen end}} | {{multi-listen end}} | ||
=Unique Areas= | =Unique Areas= | ||
Unique areas include containment chambers or other rooms of interest that spawn only once. These areas may include valuable items, weapons or have an important gameplay role. | Unique areas include containment chambers or other rooms of interest that spawn only once. These areas may include valuable items, weapons or have an important gameplay role. | ||
==Elevator Systems== | ==Elevator Systems== | ||
{{ZoneImage|ImageName=hczelevatorA|description=Elevator System A}} | |||
{{ZoneImage|ImageName=hczelevatorB|description=Elevator System B}} | |||
The '''Elevator Systems''' are two separate rooms that contain two elevators that connect Heavy Containment Zone to [[Light Containment Zone]]. Players can use the elevators to go up to Light Containment Zone. | |||
The '''Elevator Systems''' are two separate rooms | |||
Above each elevator is a timer showing how much time is left until Light Containment Zone gets [[Decontamination Process|Decontaminated]]. | |||
| Line 25: | Line 34: | ||
{{multi-listen item|filename=The Waiting Game.mp3|title=Elevator Music|description=}} | {{multi-listen item|filename=The Waiting Game.mp3|title=Elevator Music|description=}} | ||
{{multi-listen end}} | {{multi-listen end}} | ||
<br clear=all> | <br clear=all> | ||
== | ==Tesla Gate== | ||
{{ZoneImage|ImageName=teslagate|October=pumpkingate|description=An inactive Tesla Gate}} | |||
{{ZoneImage|ImageName=teslagatefiring2|October=pumpkingatefiring|description=An active Tesla Gate.}} | |||
'''Tesla Gates''' are straight hallways equipped with high powered tesla coils. | |||
{{ | |||
| | |||
| | |||
}} | |||
After the player steps far enough into the a room, the Tesla Gate will activate its sensors and prepare to fire. If the player approaches close enough to the Tesla Gate, it will quickly wind up its coils before firing out a wall of electricity. This eletrical wall deals massive damage to anything it hits, instantly killing humans and [[SCP-049-2]]. Tesla Gates only deal damage for three ticks, allowing most SCPs to not die in one blast. The amount of damage for each tick is a random number from 200 to 300.<br> | |||
Tesla Gates are quite loud and can be heard from several rooms away when operational. | |||
If SCP-079 viewing a room containing a Tesla Gate, the tesla coil will begin to charge itself even if no player is nearby. | |||
<br clear=all> | |||
==Server Room== | |||
{{ZoneImage|ImageName=serverroomtop|description=Top of the room with an [[Emergency Power Stations|Emergency Power Station]] against the far wall, and a [[Bulletproof Locker №7]] at the closer wall.}} | |||
{{ZoneImage|ImageName=serverroombottom1|description=Bottom of the room.}} | |||
{{ZoneImage|ImageName=serverroombottom2|description=Stairs that connect one of the entrances of the room to the bottom of the servers.}} | |||
The '''Server Room''' is a two-level room full of servers. It is a straight hallway variant. This room is mainly used for hiding. | |||
A Scientist Keycard can spawn either on the top or bottom floor behind the servers.<br> | |||
Up to two First Aid Cabinets or Emergency Power Stations can also spawn on the top floor. | |||
2 common hiding spots in this room include behind any of the servers or in a small area under the stairs. | |||
'''Guaranteed Spawns:''' | |||
* [[Keycard|Scientist Keycard]] | |||
[[ | |||
'''Possible Spawns:''' | |||
*On the top floor: | |||
** [[First Aid Cabinet]] (up to two) | |||
** [[Emergency Power Stations]] (up to two) | |||
** [[Workstation]] | |||
<br clear=all> | |||
==Alpha Warhead Silo== | |||
{{ZoneImage|ImageName=hczwarheadbottom|description=The lower level of the room that connects to the rest of HCZ.}} | |||
{{ZoneImage|ImageName=hczwarhead|description=The Alpha Warhead.}} | |||
{{ZoneImage|ImageName=hzcwarheadside|description=The side area of the room.}} | |||
{{ZoneImage|ImageName=hczwarheadpanel|description=The control panel and entrance to the armory.}} | |||
{{ZoneImage|ImageName=hczwarheadarmory|description=Overview of the armory with a [[Weapon Locker Type 21]].}} | |||
The '''Alpha Warhead Silo''' is the location of the [[Alpha Warhead]]. It is located above HCZ, and can only be accessed via an elevator system. An [[Emergency Power Stations|Emergency Power Station]] can spawn along the wall opposite of the elevator that leads up to the silo. | |||
In the center of the area, is the silo itself, with the Alpha Warhead seated in place. <br> | |||
Opposite of the elevator system is a small control room, which contains a control panel. This panel is used to activate or deactivate the warhead. <br> | |||
The control room is covered by a wall with openings that face the elevator system. These openings make great cover when shooting enemies coming up the elevator. | |||
<br | Beside the control panel is an armory which does not require a Keycard to enter. <br> | ||
The armory will always contain a [[Workstation]], and either a [[MTF-E11-SR Rack]] or [[Weapon Locker Type 21]] as well. <br> | |||
[[ | |||
[[ | |||
{{Related|Soundtrack}} | |||
{{multi-listen start}} | |||
{{multi-listen item|filename=The Waiting Game.mp3|title=Elevator Music|description=}} | |||
{{multi-listen end}} | |||
'''Guaranteed Spawns:''' | |||
*Shelves outside armory | |||
**[[Keycard|Zone Manager Keycard]] | |||
*In the armory: | |||
** [[MTF-E11-SR Rack]] or [[Weapon Locker Type 21]] | |||
'''Possible Spawns:''' | |||
*Outside the armory: | |||
** [[First Aid Cabinet]] | |||
** [[Bulletproof Locker №7]] | |||
*Outside the control room: | |||
** [[First Aid Cabinet]] | |||
*Lower level, opposite of the elevator: | |||
**[[Emergency Power Stations|Emergency Power Station]] | |||
<br clear=all> | <br clear=all> | ||
== | ==Ammunition Armory== | ||
{{ZoneImage|ImageName=hczarmoryoverview}} | |||
{{ZoneImage|ImageName=hczarmoryinside|description=Inside of the armory with a [[COM-18]] next to the Ammunition stack.}} | |||
The ''' | {{DoorStats| | ||
|ReqAccess=AA1 | |||
|AP = 50 | |||
|DestroyLvl=Lvl1 | |||
}} | |||
The '''Ammunition Armory''' is a T-shaped area which is connected with a three-way walkway. Falling off the walkway and into the pit will instantly kill the player. | |||
<div style="white-space:normal; font-size:15px">The armory itself requires {{HoverKeycard|Required Access1=AA1}} to open.</div> The armory includes a number of 9x19mm and 5.56x45mm ammo boxes and a [[Workstation]]. There is also a chance for a [[Bulletproof Locker №7]] to spawn inside the armory. | |||
The two outside walls of the armory are also possible spawn locations for [[Emergency Power Stations]]. | |||
''' | '''Guaranteed Spawns:''' | ||
* [[ | *Inside the armory | ||
* [[ | **[[COM-18]] | ||
**[[Flashlight]] | |||
**[[Radio]] | |||
**9x19mm Ammo (210 Rounds) | |||
**5.56x45mm Ammo (120 Rounds) | |||
'''Possible Spawns:''' | |||
*Inside the armory: | |||
** [[Bulletproof Locker №7]] | |||
** [[First Aid Cabinet]] | |||
*On the outside walls: | |||
** [[First Aid Cabinet]] (up to two) | |||
** [[Emergency Power Stations|Emergency Power Station]] (up to two) | |||
<br clear=all> | |||
==Micro H.I.D. Armory== | ==Micro H.I.D. Armory== | ||
{{ZoneImage|ImageName=microoverview}} | |||
{{ZoneImage|ImageName=microentrance|description=The area right outside the armory.}} | |||
{{ZoneImage|ImageName=microarmory|description=Inside of the armory.}} | |||
{{DoorStats| | {{DoorStats| | ||
|ReqAccess=AA3 | |ReqAccess=AA3 | ||
| Line 132: | Line 147: | ||
|DestroyLvl=Lvl1 | |DestroyLvl=Lvl1 | ||
}} | }} | ||
The '''Micro H.I.D. Armory''' is a hallway that is separated into two sections by a wall and two doors | The '''Micro H.I.D. Armory''' is a hallway that is separated into two sections by a wall and two doors. This wall contains a breakable glass window. <br> | ||
Behind the two doors is a side room containing multiple server racks, similar to the ones seen in the Server Room. This side room has a chance for a [[Bulletproof Locker №7]] to spawn in it, and two [[Emergency Power Stations]] can spawn on the wall as well.<br> | |||
<div style="white-space:normal; font-size:15px">In the middle of the side room is a armory that requires {{HoverKeycard|Required Access1=AA3}} to open. The room contains the [[Micro H.I.D.]] and a [[Workstation]]. </div><br> | |||
'''Guaranteed Spawns:''' | |||
*In the armory | |||
** [[Micro H.I.D.]] | |||
** [[Workstation]] | |||
'''Possible Spawns:''' | |||
*In the side room | |||
** [[Bulletproof Locker №7]] | |||
** [[First Aid Cabinet]] (up to two) | |||
** [[Emergency Power Stations|Emergency Power Station]] (up to two) | |||
<br clear=all> | <br clear=all> | ||
==SCP-049's Containment Area== | ==SCP-049's & SCP-173's Containment Area== | ||
[[ | {{ZoneImage|ImageName=bottom049&173|description=The lower level of the room that connects to the rest of HCZ, with a [[First Aid Cabinet]] against the wall.}} | ||
[[ | {{ZoneImage|ImageName=entrance049173|description=The entrance to the upper floor.}} | ||
{{ZoneImage|ImageName=049cont049&173| description= Overview of the exterior of [[SCP-049|SCP-049's]] containment chamber, with a [[Facility Guard]] corpse next to a pillar.}} | |||
{{ZoneImage|ImageName=armory049&173|description=Overview of the armory with a [[Weapon Locker Type 21]].}} | |||
{{ZoneImage|ImageName=173cont049&173|description=Overview of [[SCP-173|SCP-173's]] containment chamber.}} | |||
{{ZoneImage|ImageName=upstairs049&173|description=The upstairs section of the upper floor with a [[Bulletproof Locker №7]].}} | |||
<small>'''(Armory)'''</small><br> | <small>'''(Armory)'''</small><br> | ||
{{DoorStats| | {{DoorStats| | ||
| Line 159: | Line 179: | ||
|DestroyLvl=Lvl1 | |DestroyLvl=Lvl1 | ||
}} | }} | ||
'''SCP-049's Containment Area''' is a hallway that contains an elevator leading to the containment | '''SCP-049's & SCP-173's Containment Area''' is a hallway that contains an elevator leading to the containment cells of [[SCP-049]] and [[SCP-173]]. | ||
<div style="white-space:normal; font-size:15px">When a player travels down the elevator into SCP-049's & SCP-173's Containment Area, and goes down the left hallway. They are greeted to a large open area with two doors, pillars and some shelves. The bigger gate door leads to SCP-049's containment chamber that contains a [[Keycard|Guard Keycard]] spawn. The normal door leads to an armory, which requires {{HoverKeycard|Required Access1=AA2}} to open. A [[Bulletproof Locker №7]] and [[First Aid Cabinet]] can also spawn outside the armory along the pillars.</div> | |||
The armory contains a [[Workstation]] on the right wall of the room. The left wall of the room will either contain a [[MTF-E11-SR Rack]] | The armory contains a [[Workstation]] on the right wall of the room. The left wall of the room will either contain a [[MTF-E11-SR Rack]] or a [[Weapon Locker Type 21]].<br> | ||
A [[Emergency Power Stations|Emergency Power Station]] can also spawn on the wall of the bottom floor hallway. | |||
[[SCP-049]] will spawn inside his containment chamber at the start of the round. A destroyed Blue First Aid Cabinet will always spawn right outside this chamber. No items will ever spawn inside it.<br> | |||
Next to the pillars is a dead Facility Guard. An [[Adrenaline]] can be found on the ground nearby them, which belongs to the destroyed Blue First Aid Cabinet from earlier. | |||
In a back area of the room contains the chamber where [[SCP-173]] will spawn. A First Aid Cabinet or Bulletproof Locker №7 can spawn opposite of the entrance to this chamber. | |||
{{Related|Soundtrack}} | |||
{{multi-listen start}} | |||
{{multi-listen item|filename=The Waiting Game.mp3|title=Elevator Music|description=}} | |||
{{multi-listen end}} | |||
'''Guaranteed Spawns:''' | |||
*Inside SCP-049's chamber: | |||
**[[Keycard|Guard Keycard]] | |||
*In the armory: | *In the armory: | ||
** [[ | ** [[FSP-9]] | ||
** [[MTF-E11-SR Rack]] or [[Weapon Locker Type 21]] | |||
** [[Workstation]] | |||
*Next to the dead Facility Guard | |||
**[[Adrenaline]] | |||
* | |||
'''Possible Spawns:''' | |||
*Hallway: | |||
** [[First Aid Cabinet]] (x2) | |||
** [[Emergency Power Stations|Emergency Power Station]] | |||
*Across from SCP-173's chamber: | |||
** [[Bulletproof Locker №7]] | |||
<br clear=all> | <br clear=all> | ||
==SCP-079's Containment Area== | ==SCP-079's Containment Area== | ||
{{ZoneImage|ImageName=079entrance|description=Entrance with a [[First Aid Cabinet]] against the far wall.}} | |||
{{ZoneImage|ImageName=079airlock|description=The "airlock" that is between the entrance and the main chamber.}} | |||
{{ZoneImage|ImageName=079overview1|description=The entrance of the chamber itself.}} | |||
{{ZoneImage|ImageName=079overview2|description=Overview of the room.}} | |||
{{DoorStats| | {{ZoneImage|ImageName=079closeup|description=SCP-079 close up.}} | ||
|ReqAccess= | {{ZoneImage|ImageName=079armory|description=The armory inside of the chamber.}} | ||
{{ZoneImage|ImageName=ARG_PlaqueV2|description=A plaque with the names of the main people who participated in the ARG.}} | |||
{{DoorStats|Override= | |||
Locked until all three Emergency Power Stations are activated<br>Containment Access Tier 2 | |||
|ReqAccess = CC2 | |||
|AP = 110 | |AP = 110 | ||
|DestroyLvl=Lvl3 | |DestroyLvl=Lvl3 | ||
}} | }} | ||
The entrance of '''SCP-079's Containment Area''' is a small stairway which leads to the two gates outside [[SCP-079|SCP-079's]] chamber. | The entrance of '''SCP-079's Containment Area''' is a small stairway which leads to the two gates outside [[SCP-079|SCP-079's]] chamber. | ||
At the start of the round, both gates will be locked shut and cannot be opened until all 3 [[Emergency Power Stations]] have been activated. Once all 3 have been activated, the gates will be forced open. | |||
Behind the | Behind the gates is a medium sized room that contains SCP-079 behind a cage. <br> | ||
There is also a side room that contains lots of loot and a button to terminate SCP-079. Pressing the button will cause the [[Overcharge]] event to occur, and will allow the gates to be open/closed with any keycard with Containment Tier 2. Near the upper right of the button, one of the five hidden Hubertballs can be found. It is nearly impossible to see without noclip. | |||
A plaque can also be found in SCP-079's room for the ARG event held in December of 2019. The plaque has a list of the main people who participated in the event. <br> | |||
A plaque can be found in SCP-079's room for the ARG event held in December of 2019. The plaque has a list of the main people who participated in the event. <br> | |||
Scanning the QR code on the plaque leads to the [https://i.imgur.com/BE4HKAk.jpg| following link] | Scanning the QR code on the plaque leads to the [https://i.imgur.com/BE4HKAk.jpg| following link] | ||
'''Possible | The area outside the gates contains two possible spawn locations for [[Emergency Power Stations]]. | ||
* [[ | |||
'''Guaranteed Spawns:''' | |||
*In the armory: | |||
**Firearms: | |||
*** [[Crossvec]] | |||
**Grenades: | |||
*** 3 [[Flashbang Grenade]]s | |||
*** 4 [[High-Explosive Grenade]]s | |||
**Ammo: | |||
*** 9x19mm (105 Rounds) | |||
**Body armors: | |||
*** 3 [[Heavy Armor]]s | |||
**Medical Items: | |||
*** 2 [[Adrenaline]]s | |||
*** 3 [[First Aid Kit]]s | |||
**Other: | |||
*** 2 [[Coin]]s (Hidden on top of an MTF-E11-SR Rack) | |||
*** [[Keycard|Facility Manager Keycard]] | |||
*** 2 [[Flashlight]]s | |||
*** 2 [[MTF-E11-SR Rack]]s | |||
****1 contains the [[FR-MG-0]] | |||
****Neither contain [[High-Explosive Grenade]]s | |||
*** 2 [[Radio]]s | |||
*** [[Workstation]] | |||
'''Possible Spawns:''' | |||
*Outside the containment chamber | |||
** [[First Aid Cabinet]] (up to two) | |||
** [[Emergency Power Stations|Emergency Power Station]] (up to two) | |||
<br clear=all> | <br clear=all> | ||
==SCP-096's Containment Area== | ==SCP-096's Containment Area== | ||
{{ZoneImage|ImageName=096overview|October=096roomhalloween|description= Overview of the room with an [[Emergency Power Stations|Emergency Power Station]] against the wall.}} | |||
{{ZoneImage|ImageName=096chamber|description=Inside of the chamber.}} | |||
{{DoorStats| | {{DoorStats| | ||
|ReqAccess=CC2 | |ReqAccess=CC2 | ||
| Line 226: | Line 280: | ||
|DestroyLvl=Lvl1 | |DestroyLvl=Lvl1 | ||
}} | }} | ||
'''SCP-096's Containment Area''' is a small room that contains [[SCP-096]]'s chamber. | '''SCP-096's Containment Area''' is a small room that contains [[SCP-096]]'s containment chamber. | ||
The room outside SCP-096's chamber contains a control panel that can't be interacted with. This smaller room has a chance for a [[Emergency Power Stations]] to spawn on the right wall in the room. There is also a chance that an [[Bulletproof Locker №7]] spawns beside the control panel. | The room outside SCP-096's chamber contains a control panel that can't be interacted with. This smaller room has a chance for a [[Emergency Power Stations|Emergency Power Station]] to spawn on the right wall in the room. There is also a chance that an [[Bulletproof Locker №7]] spawns beside the control panel. | ||
The chamber's door requires a keycard with | <div style="white-space:normal; font-size:15px">The containment chamber's door requires a keycard with {{HoverKeycard|Required Access1=CC2}} to open.</div> | ||
The chamber itself is a red-lit room, filled with movement sensors to keep track of SCP-096 when it's inside. <br> | |||
An MTF Sergeant Keycard and dead guard's body can be found on the floor in this chamber. | |||
''' | [[SCP-096]] will spawn outside its containment chamber at the start of the round. | ||
* [[Keycard|MTF | |||
'''Guaranteed Spawns:''' | |||
*Inside the containment chamber: | |||
** [[Keycard|MTF Sergeant Keycard]] | |||
'''Possible Spawns:''' | |||
*Outside the contianment Chamber: | |||
* [[Bulletproof Locker №7]] | * [[Bulletproof Locker №7]] | ||
* [[ | * [[First Aid Cabinet]] | ||
* [[Workstation]] | |||
* [[Emergency Power Stations|Emergency Power Station]] | |||
<br clear=all> | <br clear=all> | ||
==SCP-106's Containment Area== | ==SCP-106's Containment Area== | ||
{{ZoneImage|ImageName=106overview|description=Overview of the chamber.}} | |||
{{ZoneImage|ImageName=106pitoverview|description=Overview of the pit.}} | |||
[[ | {{ZoneImage|ImageName=106entrance|description=Entrance to the observation room with a [[Bulletproof Locker №7]] next to the door.}} | ||
{{ZoneImage|ImageName=106observationroom|description=The control center of the observation room.}} | |||
{{DoorStats| | {{DoorStats| | ||
|ReqAccess= | |ReqAccess=CC2 | ||
|AP = | |AP = 40 | ||
|DestroyLvl= | |DestroyLvl=Lvl1 | ||
}} | }} | ||
'''SCP-106's Containment Area''' is a massive room that contains the chamber of [[SCP-106]]. This room is a even darker compared to the rest of the HCZ. | '''SCP-106's Containment Area''' is a massive room that contains the chamber of [[SCP-106]]. This room is a even darker compared to the rest of the HCZ. | ||
To the right of the entrance is SCP-106's containment chamber. The chamber floats above the ground, held in place by powerful electromagnets. The chamber can be jumped to from the entrance platform, but missing the jump and falling is fatal. The top of the chamber can act as a hiding place or to avoid some SCPs. | To the right of the entrance is SCP-106's containment chamber. The chamber floats above the ground, held in place by powerful electromagnets. The chamber can be jumped to from the entrance platform, but missing the jump and falling is fatal no matter what class the player is. The top of the chamber can act as a hiding place or to avoid some SCPs. | ||
The main doors require a keycard with | <div style="white-space:normal; font-size:15px">The main doors require a keycard with {{HoverKeycard|Required Access1=CC2}}to open. Both doors will lead to the main control area in SCP-106's chamber.</div> | ||
Both doors function on a time lock similar to checkpoints and will automatically close after 10 seconds. | |||
An [[Emergency Power Stations|Emergency Power Station]] can spawn near the entrance of the room. | |||
[[SCP-106]] will spawn at the top of his containment chamber at the start of the round. | |||
'''Guaranteed Spawns:''' | |||
*On the shelf next to the Femur Breaker: | |||
** [[Coin]] | |||
** [[Keycard|MTF Sergeant Keycard]] | |||
'''Possible Spawns:''' | |||
*Outside the control room: | |||
**[[Bulletproof Locker №7]] | |||
** [[Emergency Power Stations|Emergency Power Station]] | |||
** [[First Aid Cabinet]] | |||
<br clear=all> | <br clear=all> | ||
==SCP-939's Containment Area== | ==SCP-939's Containment Area== | ||
{{ZoneImage|ImageName=hczleft939|description=Left Entrance}} | |||
{{ZoneImage|ImageName=hczright939|description=Right Entrance}} | |||
'''SCP-939's Containment Area''' is a | {{ZoneImage|ImageName=hczentrance939|description=The entrance to the lab.}} | ||
{{ZoneImage|ImageName=hczoverview939|description=Overview of the room with a [[Standard Locker]] against the far wall.}} | |||
{{ZoneImage|ImageName=hczscale939|description=A scale in the room with a [[COM-15]] thrown on it.}} | |||
{{ZoneImage|ImageName=hczcryo939|description=The cryopod that SCP-939 spawns in.}} | |||
'''SCP-939's Containment Area''' is a corner hallway that acts as the spawn location of [[SCP-939]]. The area contains an entire laboratory of equipment and chemicals for the studying of SCP-939. [[SCP-244]]-B can not spawn in this room. | |||
The room is divided into three parts, the entrance, the laboratory, and the Cryo Storage. The entrance area has nothing of value and simply acts as the connection to the rest of Heavy Containment Zone via two doors, both of which have green pipes near them. The laboratory is marked by a sign warning individuals the area is used for the containment of a Keter level SCP. | |||
The laboratory itself contains spawn points for structures such as [[Standard Locker]]s and [[First Aid Cabinet]]s. The outer walls of the laboratory contain various unopenable storage containers, counters with lab equipment, unopenable cabinets and a whiteboard. The middle of the room contains an island with various lab equipment on it. The scale found on the island is interactable, any item or ragdoll that lands on top of it will have its weight measured. If multiple objects are on the scale all at once, the scale will add up all of their weight. This includes the second scale in the room that has an unmoveable prop on top of it.<br> | |||
Interestingly, the weight of items displayed by the scale is not 1:1 with the item's actual weight in the code due to rounding. Any item that weighs 5kg or more will display "Err" on the scale. Putting the Micro H.I.D. on the scale will display "Next time eat a salad". | |||
<div class="mw-collapsible mw-collapsed" id="mw-customcollapsible-myDivision"> | |||
<span class="mw-customtoggle-myDivision"><br><span style="border-bottom: 1px dotted; font-size:15px">Items Weighed by Scale Chart (Click to view)</span></span><div class="mw-collapsible-content" style="height: auto"><br> | |||
{|class="wikitable" style="display: inline-table;" | |||
!style="text-align:center; font-size:15px;"|Item | |||
!style="text-align:center; font-size:15px;"|Result | |||
|- | |||
|{{914 Item 2|Coin}} | |||
|3g | |||
|- | |||
| style="background-color: #2e2e2e;" |{{914 Item 2|SCP-2176}} | |||
| style="background-color: #2e2e2e;" |473g | |||
|- | |||
|{{914 Item 2|COM-15}} | |||
|615g | |||
|- | |||
| style="background-color: #2e2e2e;" |{{914 Item 2|SCP-207}} | |||
| style="background-color: #2e2e2e;" |945g | |||
|} | |||
</div> | |||
</div> | |||
Connected to the laboratory, is the Cryo Storage Area and is where SCP-939 will spawn at the start of the round. An [[Emergency Power Stations|Emergency Power Station]] can spawn next to the Cryo Pod. | |||
One of the five hidden Hubertballs is hidden on top of a beam at the ceiling of the room, it can not be seen without noclip. | |||
'''Possible Spawns:''' | |||
*Main Lab: | |||
** [[First Aid Cabinet]] | |||
** [[Standard Locker]] | |||
*Cryo Storage Area: | |||
** [[Emergency Power Stations|Emergency Power Station]] | |||
<br clear=all> | <br clear=all> | ||
= | ==Testroom== | ||
{{ZoneImage|ImageName=testroomoverview|description=Overview of the room with a [[First Aid Cabinet]] against the wall.}} | |||
{{ZoneImage|ImageName=testroomoffice|description=The observation room.}} | |||
== | {{ZoneImage|ImageName=testroomofficeglass|description=Walkway viewed from the observation room.}} | ||
[[ | {{ZoneImage|ImageName=testroomalternateview|description=The observation room viewed from the walkway.}} | ||
'''Testroom''' is a high area with a walkway on the left side. On the right side, behind a door, is a a small room containg a computer and a window.<br> | |||
The center of the room contains a pit that kills any player that falls down into it.<br> | |||
A [[Emergency Power Stations|Emergency Power Station]], [[Bulletproof Locker №7]], [[First Aid Cabinet]] or [[Workstation]] can also spawn on the walkway. | |||
'''Possible Spawns:''' | |||
*On the walkway: | |||
** [[Bulletproof Locker №7]] | |||
** [[First Aid Cabinet]] | |||
** [[Workstation]] | |||
** [[Emergency Power Stations|Emergency Power Station]] | |||
<br clear=all> | <br clear=all> | ||
== | ==Entrance Zone Checkpoints== | ||
{{ZoneImage|ImageName=hczezCKoverview}} | |||
A | {{ZoneImage|ImageName=hczezCKalternaterview|description=Overview of the room (Entrance Side).}} | ||
{{ZoneImage|ImageName=hczezCKside|description=The side office.}} | |||
{{ZoneImage|ImageName=hczezCKopengate|description=The gate that connects EZ and HCZ opened.}} | |||
{{DoorStats| | |||
|ReqAccess=CA | |||
|AP = 10 | |||
|DestroyLvl=RA | |||
}} | |||
The '''Entrance Zone Checkpoints''' are two checkpoints that connect Heavy Containment Zone to [[Entrance Zone]].<br> | |||
<div style="white-space:normal; font-size:15px">A keycard with {{HoverKeycard|Required Access1=CA}} is required to open the checkpoint. After 10 seconds, the checkpoint doors will close.</div> | |||
Both Checkpoints always spawn three hallways apart and in the same direction. They will always spawn in the same spot for each layout.<br> | |||
'''Possible Spawns:''' | |||
* [[First Aid Cabinet]] (up to two) | |||
<br clear=all> | <br clear=all> | ||
== | ==Hallways== | ||
<gallery mode="packed" widths=400px heights=138px> | |||
hczhallway.png|Straight Hallway | |||
hczcorneroverview2.png|Corner Hallway | |||
hczTintersection.png|T-Intersection | |||
hczXintersection.png|X-Intersection | |||
</gallery> | |||
'''Possible Spawns:''' | |||
*[[Workstation]] (T-Intersection) | |||
<br clear=all> | <br clear=all> | ||
=Map Layouts= | =Map Layouts= | ||
There are five possible map layouts of Heavy Containment Zone. Special Rooms are randomized in these layouts.<br> | There are five possible map layouts of Heavy Containment Zone. Special Rooms are randomized in these layouts, HCZ/EZ Checkpoint are marked via the orange room labeled EZ, this room is two hallways long. | ||
Below are all the possible map layouts | SCP-079 map rotates both HCZ and EZ on its display by 180°, these images are based off how the layouts appear in the game files and not SCP-079's map.<br> | ||
Below are all the possible map layouts.<br> | |||
Credit: | |||
*Mooshua - SL Layout Creator Tool. <!--The website is dead. Removing link for now.--> | |||
<div class="round-tabber"> | |||
<tabber> | <tabber> | ||
Tetris= | |||
<center> | <center> | ||
[[File:Layout HCZ Tetris New.png]] | |||
|-| | |-| | ||
Hyperhube= | |||
<center> | <center> | ||
[[File:Layout HCZ Hyperhube New.png]] | |||
|-| | |-| | ||
Squares= | |||
<center> | <center> | ||
[[File:Layout HCZ Squares New.png]] | |||
|-| | |-| | ||
Circuit= | |||
<center> | <center> | ||
[[File:Layout HCZ Circuit New Fixed.png]] | |||
|-| | |-| | ||
Golem= | |||
<center> | <center> | ||
[[File:Layout HCZ Golem New.png]] | |||
</tabber> | </tabber> | ||
=Related Achievements= | |||
{{Achievements}} | |||
=Trivia= | =Trivia= | ||
* | *The Testroom servered as SCP-939's spawn before the [[Updates/12.0.0|12.0.0]] Mimicry Update. | ||
**The room did not have a death pit like it does now. Instead, the side area contained a series of ramps that led to the bottom of the room, which is where SCP-939-53 and SCP-939-89 could spawn. | |||
**The side area was replaced with a small office and the bottom became a death pit. The small office was an idea suggested by a patron (Dan∞#9999), who even created a mock up render. | |||
[[Category:Zones]] | [[Category:Zones]] | ||
{{Locations Navbox}} | {{Locations Navbox}} | ||
Latest revision as of 23:53, 21 January 2024
Subsection-05 of Site-02, also known as the Heavy Containment Subsection, or Heavy Containment Zone, is one of four zones found in SCP: Secret Laboratory. The zone contains several important features such as the Micro H.I.D., the Alpha Warhead Silo, as well as the three Emergency Power Stations.
Operational Guide Overview
The Heavy Containment Subsection, also known as Subsection-05, is one of Site-02’s most secure subsections. Dedicated to the secure containment of numerous dangerous Keter and Euclid class anomalies, such as instances of SCP-939 and SCP-106. The Heavy Containment Subsection contains many tools that security may utilize in the containment and security of anomalies.

Subsection-05 is composed of P-S-3 electrostatic tesla gates and additional subsections. These include Subsection-05-1 and Subsection-05-2, both with various uses ranging from dedicated SCP-containment to the on-site nuclear warhead.

___
“Another log. May as well keep some of my thoughts collected at least. Termination tests for 096 are going nowhere. Nobody can figure out how to snap, chip, or otherwise break its bone structure. Project Segmentum isn't getting any better, it's still locked up in its service locker. Techies are still trying to figure out some new method of delivering its energy supply. The only thing that does happen on the regular is 106’s containment breaches. Either I'm missing out on the fun stuff or our work here is entirely pointless.”

-Charles H. Goodwin, Analyst, Site-02
Description
Heavy Containment Zone (HCZ) is one of four zones in Site-02.
Placed below Light Containment Zone and located right next to Entrance Zone, it is considered one of the most dangerous zones, as it is the spawn location for all the playable SCPs.
Heavy Containment Zone is also the only zone affected by the Overcharge event, which is used to re-contain SCP-079. This event occurs after all 3 Emergency Power Stations have been activated, and the button in SCP-079's Containment Chamber is pushed (this will also occur when SCP-079 is the last SCP alive).
Heavy Containment Zone contains a few important rooms that contain items that can aid a player in escaping or re-containing certain SCP.
Related article: Soundtrack
Unique Areas
Unique areas include containment chambers or other rooms of interest that spawn only once. These areas may include valuable items, weapons or have an important gameplay role.
Elevator Systems


The Elevator Systems are two separate rooms that contain two elevators that connect Heavy Containment Zone to Light Containment Zone. Players can use the elevators to go up to Light Containment Zone.
Above each elevator is a timer showing how much time is left until Light Containment Zone gets Decontaminated.
Related article: Soundtrack
Tesla Gate


Tesla Gates are straight hallways equipped with high powered tesla coils.
After the player steps far enough into the a room, the Tesla Gate will activate its sensors and prepare to fire. If the player approaches close enough to the Tesla Gate, it will quickly wind up its coils before firing out a wall of electricity. This eletrical wall deals massive damage to anything it hits, instantly killing humans and SCP-049-2. Tesla Gates only deal damage for three ticks, allowing most SCPs to not die in one blast. The amount of damage for each tick is a random number from 200 to 300.
Tesla Gates are quite loud and can be heard from several rooms away when operational.
If SCP-079 viewing a room containing a Tesla Gate, the tesla coil will begin to charge itself even if no player is nearby.
Server Room


The Server Room is a two-level room full of servers. It is a straight hallway variant. This room is mainly used for hiding.
A Scientist Keycard can spawn either on the top or bottom floor behind the servers.
Up to two First Aid Cabinets or Emergency Power Stations can also spawn on the top floor.
2 common hiding spots in this room include behind any of the servers or in a small area under the stairs.
Guaranteed Spawns:
Possible Spawns:
- On the top floor:
- First Aid Cabinet (up to two)
- Emergency Power Stations (up to two)
- Workstation
Alpha Warhead Silo


The Alpha Warhead Silo is the location of the Alpha Warhead. It is located above HCZ, and can only be accessed via an elevator system. An Emergency Power Station can spawn along the wall opposite of the elevator that leads up to the silo.
In the center of the area, is the silo itself, with the Alpha Warhead seated in place.
Opposite of the elevator system is a small control room, which contains a control panel. This panel is used to activate or deactivate the warhead.
The control room is covered by a wall with openings that face the elevator system. These openings make great cover when shooting enemies coming up the elevator.
Beside the control panel is an armory which does not require a Keycard to enter.
The armory will always contain a Workstation, and either a MTF-E11-SR Rack or Weapon Locker Type 21 as well.
Related article: Soundtrack
Guaranteed Spawns:
- Shelves outside armory
- In the armory:
Possible Spawns:
- Outside the armory:
- Outside the control room:
- Lower level, opposite of the elevator:
Ammunition Armory


 |
Armory Access Tier 1 Required |
 |
SCP-079 AP Cost: 50 AP |
 |
Door can be destroyed with explosives, SCP-018 and SCP-096 |
The Ammunition Armory is a T-shaped area which is connected with a three-way walkway. Falling off the walkway and into the pit will instantly kill the player.
The armory itself requires Armory Access 1 
Armory Access 1
to open.
![]()
![]()
![]()
![]()
![]()
![]()
![]()
![]()
![]()
![]()
![]()
![]()
The armory includes a number of 9x19mm and 5.56x45mm ammo boxes and a Workstation. There is also a chance for a Bulletproof Locker №7 to spawn inside the armory.
The two outside walls of the armory are also possible spawn locations for Emergency Power Stations.
Guaranteed Spawns:
- Inside the armory
- COM-18
- Flashlight
- Radio
- 9x19mm Ammo (210 Rounds)
- 5.56x45mm Ammo (120 Rounds)
Possible Spawns:
- Inside the armory:
- On the outside walls:
- First Aid Cabinet (up to two)
- Emergency Power Station (up to two)
Micro H.I.D. Armory


 |
Armory Access Tier 3 Required |
|
SCP-079 AP Cost: 70 AP |
|
Door can be destroyed with explosives, SCP-018 and SCP-096 |
The Micro H.I.D. Armory is a hallway that is separated into two sections by a wall and two doors. This wall contains a breakable glass window.
Behind the two doors is a side room containing multiple server racks, similar to the ones seen in the Server Room. This side room has a chance for a Bulletproof Locker №7 to spawn in it, and two Emergency Power Stations can spawn on the wall as well.
In the middle of the side room is a armory that requires Armory Access 3 
Armory Access 3
to open. The room contains the Micro H.I.D. and a Workstation.
![]()
![]()
![]()
![]()
![]()
![]()
![]()
![]()
![]()
![]()
![]()
![]()
Guaranteed Spawns:
- In the armory
Possible Spawns:
- In the side room
- Bulletproof Locker №7
- First Aid Cabinet (up to two)
- Emergency Power Station (up to two)
SCP-049's & SCP-173's Containment Area


(Armory)
 |
Armory Access Tier 2 Required |
|
SCP-079 AP Cost: 60 AP |
|
Door can be destroyed with explosives, SCP-018 and SCP-096 |
SCP-049's & SCP-173's Containment Area is a hallway that contains an elevator leading to the containment cells of SCP-049 and SCP-173.
When a player travels down the elevator into SCP-049's & SCP-173's Containment Area, and goes down the left hallway. They are greeted to a large open area with two doors, pillars and some shelves. The bigger gate door leads to SCP-049's containment chamber that contains a Guard Keycard spawn. The normal door leads to an armory, which requires Armory Access 2 
Armory Access 2
to open. A Bulletproof Locker №7 and First Aid Cabinet can also spawn outside the armory along the pillars.
![]()
![]()
![]()
![]()
![]()
![]()
![]()
![]()
![]()
![]()
![]()
![]()
The armory contains a Workstation on the right wall of the room. The left wall of the room will either contain a MTF-E11-SR Rack or a Weapon Locker Type 21.
A Emergency Power Station can also spawn on the wall of the bottom floor hallway.
SCP-049 will spawn inside his containment chamber at the start of the round. A destroyed Blue First Aid Cabinet will always spawn right outside this chamber. No items will ever spawn inside it.
Next to the pillars is a dead Facility Guard. An Adrenaline can be found on the ground nearby them, which belongs to the destroyed Blue First Aid Cabinet from earlier.
In a back area of the room contains the chamber where SCP-173 will spawn. A First Aid Cabinet or Bulletproof Locker №7 can spawn opposite of the entrance to this chamber.
Related article: Soundtrack
Guaranteed Spawns:
- Inside SCP-049's chamber:
- In the armory:
- Next to the dead Facility Guard
Possible Spawns:
- Hallway:
- Across from SCP-173's chamber:
SCP-079's Containment Area


 |
Containment Access Tier 2 Required |
|
SCP-079 AP Cost: 110 AP |
|
Door can't be destroyed by any means |
The entrance of SCP-079's Containment Area is a small stairway which leads to the two gates outside SCP-079's chamber.
At the start of the round, both gates will be locked shut and cannot be opened until all 3 Emergency Power Stations have been activated. Once all 3 have been activated, the gates will be forced open.
Behind the gates is a medium sized room that contains SCP-079 behind a cage.
There is also a side room that contains lots of loot and a button to terminate SCP-079. Pressing the button will cause the Overcharge event to occur, and will allow the gates to be open/closed with any keycard with Containment Tier 2. Near the upper right of the button, one of the five hidden Hubertballs can be found. It is nearly impossible to see without noclip.
A plaque can also be found in SCP-079's room for the ARG event held in December of 2019. The plaque has a list of the main people who participated in the event.
Scanning the QR code on the plaque leads to the following link
The area outside the gates contains two possible spawn locations for Emergency Power Stations.
Guaranteed Spawns:
- In the armory:
- Firearms:
- Grenades:
- Ammo:
- 9x19mm (105 Rounds)
- Body armors:
- Medical Items:
- Other:
- 2 Coins (Hidden on top of an MTF-E11-SR Rack)
- Facility Manager Keycard
- 2 Flashlights
- 2 MTF-E11-SR Racks
- 1 contains the FR-MG-0
- Neither contain High-Explosive Grenades
- 2 Radios
- Workstation
Possible Spawns:
- Outside the containment chamber
- First Aid Cabinet (up to two)
- Emergency Power Station (up to two)
SCP-096's Containment Area


|
Containment Access Tier 2 Required |
|
SCP-079 AP Cost: 40 AP |
|
Door can be destroyed with explosives, SCP-018 and SCP-096 |
SCP-096's Containment Area is a small room that contains SCP-096's containment chamber.
The room outside SCP-096's chamber contains a control panel that can't be interacted with. This smaller room has a chance for a Emergency Power Station to spawn on the right wall in the room. There is also a chance that an Bulletproof Locker №7 spawns beside the control panel.
The containment chamber's door requires a keycard with Containment Access 2 
Containment Access 2
to open.
![]()
![]()
![]()
![]()
![]()
![]()
![]()
![]()
![]()
![]()
![]()
![]()
The chamber itself is a red-lit room, filled with movement sensors to keep track of SCP-096 when it's inside.
An MTF Sergeant Keycard and dead guard's body can be found on the floor in this chamber.
SCP-096 will spawn outside its containment chamber at the start of the round.
Guaranteed Spawns:
- Inside the containment chamber:
Possible Spawns:
- Outside the contianment Chamber:
- Bulletproof Locker №7
- First Aid Cabinet
- Workstation
- Emergency Power Station
SCP-106's Containment Area


|
Containment Access Tier 2 Required |
|
SCP-079 AP Cost: 40 AP |
|
Door can be destroyed with explosives, SCP-018 and SCP-096 |
SCP-106's Containment Area is a massive room that contains the chamber of SCP-106. This room is a even darker compared to the rest of the HCZ.
To the right of the entrance is SCP-106's containment chamber. The chamber floats above the ground, held in place by powerful electromagnets. The chamber can be jumped to from the entrance platform, but missing the jump and falling is fatal no matter what class the player is. The top of the chamber can act as a hiding place or to avoid some SCPs.
The main doors require a keycard with Containment Access 2
Containment Access 2
to open. Both doors will lead to the main control area in SCP-106's chamber.
![]()
![]()
![]()
![]()
![]()
![]()
![]()
![]()
![]()
![]()
![]()
![]()
Both doors function on a time lock similar to checkpoints and will automatically close after 10 seconds.
An Emergency Power Station can spawn near the entrance of the room.
SCP-106 will spawn at the top of his containment chamber at the start of the round.
Guaranteed Spawns:
- On the shelf next to the Femur Breaker:
Possible Spawns:
- Outside the control room:
SCP-939's Containment Area


SCP-939's Containment Area is a corner hallway that acts as the spawn location of SCP-939. The area contains an entire laboratory of equipment and chemicals for the studying of SCP-939. SCP-244-B can not spawn in this room.
The room is divided into three parts, the entrance, the laboratory, and the Cryo Storage. The entrance area has nothing of value and simply acts as the connection to the rest of Heavy Containment Zone via two doors, both of which have green pipes near them. The laboratory is marked by a sign warning individuals the area is used for the containment of a Keter level SCP.
The laboratory itself contains spawn points for structures such as Standard Lockers and First Aid Cabinets. The outer walls of the laboratory contain various unopenable storage containers, counters with lab equipment, unopenable cabinets and a whiteboard. The middle of the room contains an island with various lab equipment on it. The scale found on the island is interactable, any item or ragdoll that lands on top of it will have its weight measured. If multiple objects are on the scale all at once, the scale will add up all of their weight. This includes the second scale in the room that has an unmoveable prop on top of it.
Interestingly, the weight of items displayed by the scale is not 1:1 with the item's actual weight in the code due to rounding. Any item that weighs 5kg or more will display "Err" on the scale. Putting the Micro H.I.D. on the scale will display "Next time eat a salad".
Items Weighed by Scale Chart (Click to view)
Connected to the laboratory, is the Cryo Storage Area and is where SCP-939 will spawn at the start of the round. An Emergency Power Station can spawn next to the Cryo Pod.
One of the five hidden Hubertballs is hidden on top of a beam at the ceiling of the room, it can not be seen without noclip.
Possible Spawns:
- Main Lab:
- Cryo Storage Area:
Testroom


Testroom is a high area with a walkway on the left side. On the right side, behind a door, is a a small room containg a computer and a window.
The center of the room contains a pit that kills any player that falls down into it.
A Emergency Power Station, Bulletproof Locker №7, First Aid Cabinet or Workstation can also spawn on the walkway.
Possible Spawns:
- On the walkway:
Entrance Zone Checkpoints


 |
Checkpoint Access Required |
|
SCP-079 AP Cost: 10 AP |
|
Door can only be destroyed with Remote Admin |
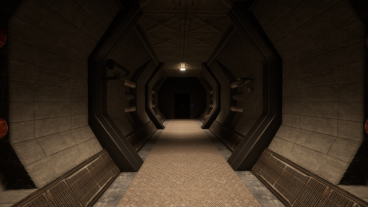
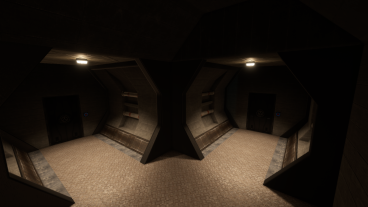
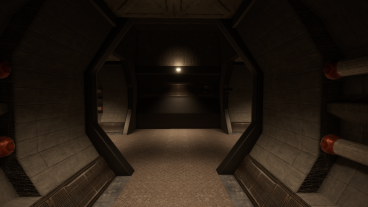
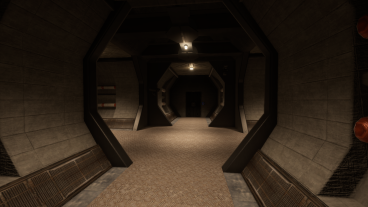
The Entrance Zone Checkpoints are two checkpoints that connect Heavy Containment Zone to Entrance Zone.
A keycard with Checkpoint Access 
Checkpoint Access
is required to open the checkpoint. After 10 seconds, the checkpoint doors will close.
![]()
![]()
![]()
![]()
![]()
![]()
![]()
![]()
![]()
![]()
![]()
![]()
Both Checkpoints always spawn three hallways apart and in the same direction. They will always spawn in the same spot for each layout.
Possible Spawns:
- First Aid Cabinet (up to two)
Hallways
-
Straight Hallway
-
Corner Hallway
-
T-Intersection
-
X-Intersection
Possible Spawns:
- Workstation (T-Intersection)
Map Layouts
There are five possible map layouts of Heavy Containment Zone. Special Rooms are randomized in these layouts, HCZ/EZ Checkpoint are marked via the orange room labeled EZ, this room is two hallways long.
SCP-079 map rotates both HCZ and EZ on its display by 180°, these images are based off how the layouts appear in the game files and not SCP-079's map.
Below are all the possible map layouts.
Credit:
- Mooshua - SL Layout Creator Tool.


Related Achievements
Click to view 3 achievement(s) related to Heavy Containment Zone:
| Overcurrent | |
 |
Jump into a Tesla Gate while holding the Micro H.I.D. |
| Proceed With Caution | |
 |
Successfully pass through a Tesla Gate that SCP-079 is watching. |
| That was... close. | |
 |
Cancel the Alpha Warhead with 15 seconds or less remaining. |
Trivia
- The Testroom servered as SCP-939's spawn before the 12.0.0 Mimicry Update.
- The room did not have a death pit like it does now. Instead, the side area contained a series of ramps that led to the bottom of the room, which is where SCP-939-53 and SCP-939-89 could spawn.
- The side area was replaced with a small office and the bottom became a death pit. The small office was an idea suggested by a patron (Dan∞#9999), who even created a mock up render.
| ||||||||||||||||||||||